Monday, January 31, 2011

Two finishes for the price of one

Ta da!  My Sliced Coins twin quilts are officially complete!


I'm so excited to share these quilts with you.  Why am I excited?  Other than the obvious super fun sensation of finishing off a new quilt, there's several reasons...

1. These quilts are going to my newest cousins, Kayla and Tristan, who were born in December (so I'm a bit behind!).
2. My first quilt finish for 2011 is a two-fer!
3. I'm actually checking something off my list of lofty quilty goals for this year.
4. I really loved working on these quilts.  These fabrics are so fun to play with; just seeing them every day made me smile.


Don't ask me to pick a favorite, it's just not possible.   I really love both of these quilts.  It was a lot of fun to get to play with lots of pink fabrics in Kayla's quilt for once, but I also really love all of the gorgeous blues in Tristan's quilt.  My son really covets that quilt; fortunately, there's a new quilt in the works for him, so I don't think he'll be too upset to see me ship this one off.

I had so much fun making these quilts that I am seriously considering making one more, so I can have something around my house to remind me of this super fun quilt-along.  And I definitely need to get my hands on more of Laurie Wisbrun's fabrics, they're just so much fun!

Quilt Stats
Size: approx. 54" x 57"
Pattern: Sliced Coins Quilt by me
Fabrics: Laurie Wisbrun's Urban Circus, Ann Kelle's Remix, Alexander Henry's 2D Zoo, Joel Dewberry;s Aviary and various Kona solids

I'm linking up this week with a few different things...{Sew} Modern Monday and Gen X Quilters' Love Nest quilt show.

{Sew} Modern Monday at Canoe Ridge CreationsGen X Quilters
Friday, January 28, 2011

Sliced Coins Quilt Along: Assembly

Welcome to the second week of the quilt along.  If you're just joining the quilt-along, please click here to visit the cutting instructions and here for the materials list.

Now that you've got your fabrics all cut up, I imagine you're just dying to start putting your quilt together.  This week, we're going to be laying out our coin stacks and adding our slices.

Do you have a design wall?  I do, but I actually didn't use it for laying these quilts out - it's becoming more of a landing strip for all of my works in progress at the moment.  If you're interested in a design wall and don't have one yet, there's lots of options - a flannel sheet works great and so does the back of a vinyl tablecloth because they're usually flannel.  Mine is a Fons & Porter Design Wall that I happened to get a ridiculous deal on.  I highly recommend having a design wall, I don't know how I ever quilted without one!
A table top can work well as a design space too!

You can use a floor, or a sheet, or whatever works for you.  Use a measuring tape to measure on your work surface how long your stack of coins ought to be.  Use the figures, but keep in mind the math includes the slices, so you will need to trim your stacks when completed.  

Finished stacks will measure (including slices):
  • Baby - 42 1/2"
  • Crib - 52"
  • Lap - 66"
For each quilt, you'll be putting together four stacks of coins.  Play around with this.  Mix up your fabrics and mix up your coin slices.  Don't get too caught up in the layout, though, your quilt is going to look fantastic!

This is what happens when you don't have a design wall...
A sheet can make a great little "design floor"
When you're satisfied with your layout, stack your coins one on top of the other from bottom to top.  Make sure to keep them oriented correctly, if any of your fabrics are directional.  Your bottom coin should be at the bottom of the stack and your top coin at the top.  Keep your rows separate.  I used file folders to keep everything straight and labeled each folder in two ways - a row number or letter (I used letters) and a sticky note reminding me that the coins are top to bottom.

IMG_4838IMG_4839

Next, take your file folders to your sewing machine, and grab a stack of your 1" neutral slices. 

Add a slice to the bottom of each coin, with one exception - do nothing with your bottom coin, which should be at the bottom of the stack.  So, if you have 13 coins in your stack, you will add 12 slices.  Got it?

IMG_4840

Keep your coins in order.  I suggest chain piecing them, and laying them face down as you trim them from your chain to ensure they stay in order.

Next, finger press (or press with an iron, your choice) the seams you've just created on both sides.

IMG_4841

Lay your coins back in their file folder in order, with your top coin on top and your bottom coin on the bottom.


Continue to chain piece your coins and slices together until your stack is complete.  Your stack should start with a coin and end with a coin.  Press the entire stack well and label with a small piece of painter's tape or masking tape with the letter or number assigned to the stack.  I'm a press-seams-open kind of girl, but you do what you are most comfortable with.  Set aside your completed stack and grab the next file folder to do it all over again.  When you're done, you'll have four completed stacks.  Their lengths may vary slightly - don't worry about that right now, we'll fix them up and make them even next week.

IMG_4850

Next week, we'll be tackling sashing.    And then, you will have a completed quilt top!  Yippee!  Don't forget to link up your progress next Thursday and in the Flickr group as well.  Have a wonderful weekend :)
Thursday, January 27, 2011

Sliced Coins Quilt Along: Show off your cutting skills!


Are you participating in the Sliced Coins Quilt Along?  Did you write about it on your blog this week?  Link it up here, show off your beautiful stacks of fabric, all cut up and ready to sew together.

How about a work-in-progress picture to get us started?


The munchkin was uber-helpful with the basting process.  He's big on trying to help with everything lately, from helping me sort socks in the laundry to wanting to help me when I'm driving with helpful commentary like, "Mommy, watch out for that car!" and "Mommy, remember what the policeman said, don't drive too fast."  (Yes, I was pulled over during the holiday season, the first time in nearly seven years, and the munchkin was in the car.)

Add a link with a picture and your blog and make sure to visit your fellow quilt-alongers to squeal about your progress together :)


Tomorrow, I'll be sharing how to create your sliced coin stacks, so get those bobbins wound and get ready for some sewing!
Wednesday, January 26, 2011

WiP Wednesday #11

I had a super productive sewing kind of weekend.  Between actually having my husband around and just getting into a good sewing groove, I got a lot done.  Or at least I thought I did, until I started this list. Sure, I made progress, but my total quilty-ADD shows here big time.  I could have probably finished a few things off entirely, had I been able to focus on just one project.  Oh well.  I'm getting awfully close to my first two finishes of the year, and I'm having a ton of fun with my son's birthday quilt.  It was a good week!

Made some progress on:
Polka Dot quilt for the munchkin's 3rd birthday - Making some serious progress here.  I'm pretty sure I've got all the blocks made, now I'm going to add some border(s) around the blocks to break up the design a little bit.  I'm thinking I'm going to use some Kona Ash here.  For those of you who asked last week, here's the tute I used to create these blocks - Oh Fransson's Crazy 9-Patch Lattice Quilt.


Robot coin twin quilts - The quilt tops are done, now I need to get to work on some quilt backs.  I've got plenty of scraps to work with and a few Kona solids that I think will do the job.


Sliced Coin quilt along twin quilts - I made the backs for these quilts on Friday/Saturday and then finished quilting these two quilts this weekend - I was on a roll.  Now, I'm in the midst of making binding. Lots of it.  I suspect my roll will come to a complete halt now.


Spicing Up the Kitchen swap - I've got my fabrics all ready to go, just debating between what kind of apron I want to make.  I was thinking about an awesome log-cabin-esque half apron from Denyse Schmidt's book, but I'm not sure it will be up my partner's alley, so I need to do some more Flickr-stalking...

Make Mine Modern swap - I finished the first part of my swap package, a selvage pincushion this weekend, but I've still got a mini quilt to make.


Urban Home Goods swap - I'm really excited about the partner I got in this swap!  Her taste is very different from mine, so I'll get to really stretch my creative muscles, I think.

Single Girl quilt - Does joining a Flickr support group count as progress?  Nova has started a support group for those of us tackling the Single Girl pattern this year, and I've jumped right in.

Sadly, no progress on these:
Sew Fresh bee
Sewing ninja
3x6 Bee blocks - I made a list this weekend, thinking I'd find some time to start shopping in my scraps for these blocks.  I didn't.  :(

New projects:
Super special pillow tute - Have you heard that February will be Pillow Month at Sew Mama Sew?  I'm getting started on a tute that I'll be sharing over there, but it's top secret.  I can give you a sneak peek at the two stacks of fabrics I'm debating using, though...


Margaret's Hope Chest birthday quilt - Have you heard of Margaret's Hope Chest? It's a quilt charity that benefits Wrapped in Hope, who provides birthday quilts to children who have at least one parent in prison.  It's a wonderful cause, and the girl who I'll be giving a birthday quilt to this year has a thing for pink.  I'm thinking I might make her quilt via the Bloggers' Block-a-Palooza quilt along.  I started pulling some fabrics and I'm pleased to report that I shopped strictly in my stash...


WiP #11 Recap
Finished: 0 
Last week's total projects: 10
New: 2
This week's total projects: 12

So, what have you been sewing?  Hop over to the linky at Freshly Pieced to share your progress and to see what everyone else is up to.
Monday, January 24, 2011

My seam ripper and I were really tight this weekend.

I attempted two firsts this weekend.  In between trying to assemble some scrappy quilt backs, I decided to try to tackle my first project for my Make Mine Modern partner, a selvage pincushion totally inspired by Live a Colorful Life.  I decided it needed some piping to make the selvages pop a little, so I hiked over to Jo-Ann's and bought a nice assortment of colors, then proceeded to visit Sew 4 Home, one of my favorite tutorial sites.  Their piping tute seemed pretty good.  I read it and re-read it, then I felt pretty good about how to do it, so I tried.  It was bad.

So out came my seam ripper.


I tried again, using the same method, and again, had to get out my seam ripper.  Again.  And again.  And again.  I think I ripped the piping out at least five or six times.  I also got out lots of obscenities and my husband came to check on me to make sure I didn't hurt myself or something.


I went back to Google, and found a tute at Clever Nesting that got me over the hump and got to me forgive piping, which I swore off in this process with a slew of four-letter words.  I finished off the first pincushion, filled it up with some rice, and shoved some pins in it.  I wasn't sure I was in love with how it turned out, so I decided to churn out one more, see if it was any easier, if it turned out any nicer.


Piping the second one was infinitely easier.  Miles easier.  I only had to get the seam ripper out once.


I'm really looking forward to the next project I have planned for my swap partner, but I'm not going to get started on it for a few days - I see some actual quilting in my future now that I've finished off some quilt backs.

I'm linking up with {Sew} Modern Monday over at Canoe Ridge Creations, check it out to see what other goodies everyone's making!

{Sew} Modern Monday at Canoe Ridge Creations

I'm also linking up with Fabric Tuesday this week over at QuiltStory.  I can't see what Heather and Megan are up to, they have gorgeous taste in fabrics!


Fresh Poppy Design
Saturday, January 22, 2011

I love when projects come together easily

I started working on this wonky 9-patch quilt for my son's birthday this week, after much internal debate about what pattern to do.  I had way too many ideas and sketches for this one, and ultimately, I decided to go simple and started cutting.  Managed to give myself my first rotary cutting injury in the process, but don't worry, it's just a tiny nick.


I'm going to sash the blocks with two different colors, but naturally, I'm debating about that too.  These blocks are so colorful, I was kind of thinking about using a few different colors for sashing, to keep up with the rainbow effect of the blocks, but I'm not sure yet.  I really need to put this aside to make some quilt backs this weekend.  It's going to be tough to stop on this quilt, because I'm really in love with it...


I'm not quite done making blocks, I think I'll do one more set of wonky blocks, but here's how it's coming together so far.


By the way, this quilt is so far totally nameless...though I can't seem to stop calling it A Legion of Dots in my head...

Don't forget, the cutting instructions for the quilt along are up.  Stacks of gorgeous cut fabrics are showing up in the Flickr pool already!  Have a great weekend everyone!
Friday, January 21, 2011

Sliced Coins Quilt Along: Cutting Instructions

I cannot even begin to explain how excited I am about getting started on this quilt-along today!  Today, we're going to start cutting into that beautiful fabric I've seen you all collecting on Flickr.  By the way, it's not too late to join in the quilt along fun!  Grab a button from my sidebar, join the Flickr group, and let's get started.


Now, remember, there are three different quilt sizes we're talking about here, so there's three sets of cutting instructions.  Here we go!!


Cutting your fat quarters:
Baby & Crib size quilts -
Cut your fat quarters into three strips along the longer, 22" side of your fat quarters - two measuring 9 1/2" each, and the other being your excess.  Hang onto your extra strip, you may want it later, depending on how big it is.


Lap size quilts - 
Cut your fat quarters into two 10" wide strips along the wider side of your fat quarters, which should be 22".  Hang onto your extra strip, you may want it later, depending on how big it is.  If you're using a layer cake, you won't need to make these strips, skip right to the next step.


All - 
Once you have your strips, the instructions are the same for each quilt.  You will now make your coins, by cutting your strips into randomly sized pieces.  Here's how I did it - I made five different sized coins, 8", 5", 4", 3" and 2".  You can choose whatever sizes you would like, and in fact, you can stagger the sizes depending on the size of the print on your fat quarter.  Try to keep your coins stacked together with like fabric (despite the difference in sizes) for layout purposes.

For the baby size, you will need approximately 35-45 coins.  For the crib size, you will need around 55-65 coins.  For the lap size, you will need around 60-70 coins. You will wind up cutting more than this, and we will use the extra coins to piece together a quilt back.


Cutting your sashing:
Baby - 
From your sashing, cut the following:
  • 3" x 37" - quantity of 2
  • 3" x 43" - quantity of 5  **UPDATED QUANTITY**
From what remains, cut into 1" strips, then cut those down to 1" x 9 1/2" pieces. These will be your slices for your coin stacks.  Make sure to have at least as many as you have coins.


Crib - 
From your sashing, cut the following:
  • 3 1/2" by 55" - quantity of 2
  • 3 1/2" x 52"" - quantity of 5  **UPDATED QUANTITY**
From what remains, cut into 1" strips, then cut those down to 1" x 9 1/2" pieces. These will be your slices for your coin stacks.


Lap -
From your sashing, cut the following:
  • 5 1/2" x 66 1/2" - quantity of 2
  • 5 1/2" x 66" - quantity of 5 **UPDATED QUANTITY**
From your remaining sashing, cut 1" strips, and then cut those strips into 1" x 10" pieces. These will be your slices for your coin stacks.


Want a sneak peek of how your finished top is going to look?  Here's my boy twin sliced coin quilt top.  


Next Thursday, I'll host a linky so you can show off your cutting prowess.  Next week, we'll work on layout and assembly of the coin stacks.  Happy cutting!  I can't wait to see all of those fantastic stacks of cut up fabric.  Here's mine :)


Thursday, January 20, 2011

Under construction

After some serious Craig's List stalking over the last few months, I finally stumbled on an inexpensive sewing cabinet for my sewing machine this weekend.  I've always kept my sewing machine on top of the desk I inherited from my dad, which has great drawer space, but isn't a great space for sewing.

My husband helped me pick it up before he headed out of town.  He moved it into the room where I do my sewing, which he likes to call our sitting room (it's really like a den), but I like to call it my sewing room because that's the main activity that happens there.  The cabinet has created a serious domino effect in terms of organization and space, so I've spent the last several days trying to adjust and rework things to my liking.  I still seriously need to work on organization, but I'm finally pleased with the furniture layout.

BEFORE:


AFTER:


Basically, I made a a mini sewing cubicle.  I was able to get some serious work done after I did this layout.  I still need to figure out a few things, like how to organize my growing collection of quilting rulers, but I really need to get back to work on all of my WiPs at the moment.  So here's hoping that I will find time for some spring cleaning and organization next month!

Don't forget to check back here tomorrow for the cutting instructions for the Sliced Coins Quilt Along!  :)

Wednesday, January 19, 2011

WiP Wednesday #10

Happy WiP Wednesday to you!  But before I get to my laundry list of projects, I have an award to accept.  Kristie at OCD (Obsessive Crafting Disorder) nominated me for the Stylish Blog Award over the weekend.  Me, stylish?  If you say so :)  The rules say that I have to not only share 7 things about myself but also pay it forward to 15 recently discovered great bloggers...here goes.

Seven things you may not know about me:
1. Before I became obsessed with quilting, I attempted knitting while pregnant with my munchkin.  I made a really hideous knitted coaster, and promptly gave up trying to learn.  My husband strongly suspected sewing and quilting was going to be like when I tried to take up knitting, but here I am a year later, still doing it and loving it more than ever.
2. I used to be a serious workaholic.  The kind of person who's the first in the office in the morning and the last one to leave at night.  I traveled a lot for work and sometimes I miss that part of my old job, but that's about it.
3. My sister tried to nickname me Beth as a baby.  My mother didn't like it and came up with Betsy instead.  Why they couldn't just use my given name is beyond me (and the reason that I created a spreadsheet when considering baby names, listing all possibly nicknames for the names I liked).
4. I made my stage debut at age 5 in a local theater production of "Fiddler on the Roof."  My mother worked at a theater for most of my childhood, so you could say I grew up there.  I still love going to live theater and thoroughly enjoy musicals.
5. I am a complete music-phile.  If I could, I would have a soundtrack for every moment of my day.  I love music, all different kinds of music.  When I work on a quilt, I not only sketch it, but I also make a playlist that puts me in the right mindset for the quilt.  I know, I'm a geek.
6. I love to read.  These days, I spend more time sewing and quilting than reading, but I used to go through about a book a week.  Now, I'm lucky if I can read a handful of pages before bed every night, but reading is still something I enjoy thoroughly.
7. I am seriously scatterbrained sometimes.  I'll go into the kitchen to make a pot of coffee and wind up getting distracted and clean the stove, only to wonder twenty minutes later why I didn't make a pot of coffee.

And as for a some good reads, here's a few that are new(ish) to me...


There's a heck of lot going on this week, including a bit of some reorganization thanks to a great find on Craig's List and a travelling husband.  Only a few finished WiPs since last week, but there's been a darn good bit of progress, I swear!

Finished projects:
Soft Book Tutorial
Patchwork Penny doll and quilt
String Me Along block for Linda


Still very much in progress:
Polka Dot quilt for the munchkin's 3rd birthday - I think I have finally decided on a layout for this one, so I'm hoping to start cutting this week.


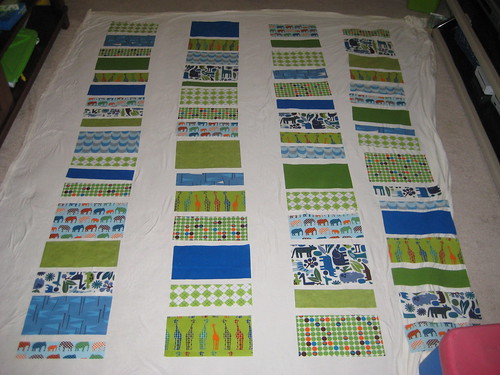
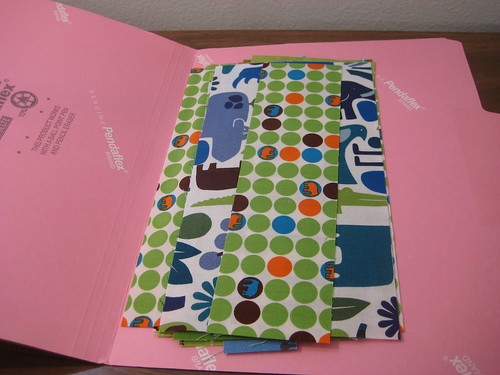
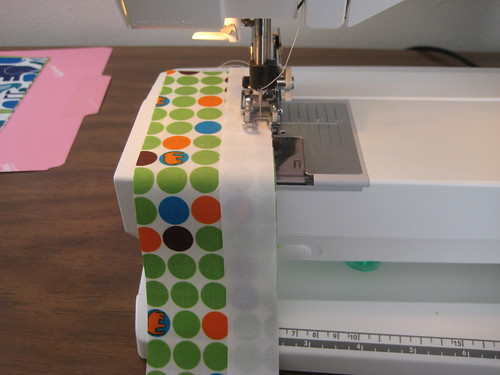
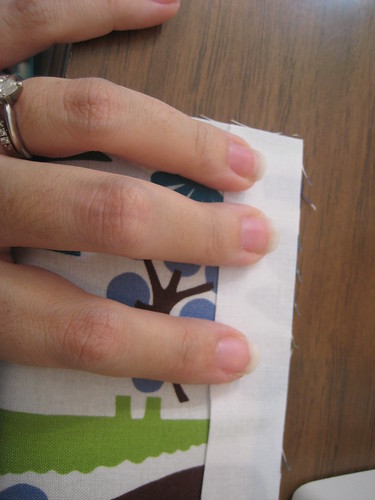
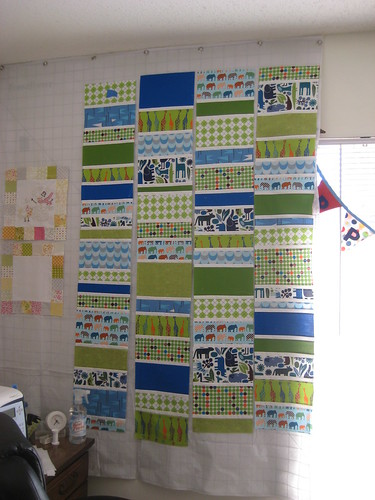
Robot coin twin quilts - I made some progress here over the weekend.  I managed to finish the coin stacks for both of these and hope to finish the tops this week.  In the meantime, my design wall is looking an awful lot like a landing strip for my WiPs...


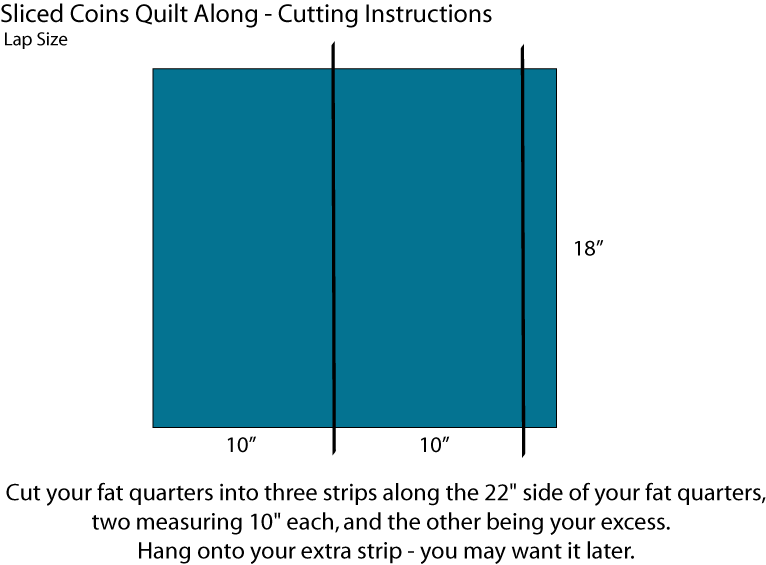
Sliced Coin quilt along twin quilts - One quilt top down, and I'll be starting the second one this week with all of my quilt along friends on Friday!


3x6 Bee blocks - Made my first protoype this week.  I'm still tweaking it, but I like how it's coming together so far.  I'm thinking about entering this in the upcoming Quilt Story Block Party in February...


Zero progress:
Single Girl quilt - waiting on that extra 25th hour of the day I asked for at Christmas to show up...


Sew Fresh bee - waiting on fabric

Sewing ninja - I completely forgot about this project this week.  Maybe I'll try to finish it up when I catch up on The Fashion Show tonight...

New projects:
Spicing Up the Kitchen swap - I got my partner over the weekend, and I'm super excited.  I know exactly what I'm going to make, but it's a secret swap, so I'm going to keep the details vague for now.  I may share a sneak peek every now and again, though!

Make Mine Modern swap - I just found out my partner yesterday, and I'm super excited.  It's another secret partner swap, so I'm going to keep what I share to a minimum, but there will definitely be sneak peeks!  I've got a pretty good idea of what I'm going to make, and I'm really looking forward to getting started soon.

Urban Home Goods swap - I'm waiting to find out who my partner is on this one, but I'm hoping to find out this week so I can get to sketching and planning.

WiP #10 Recap
Finished: 3
Last week's total projects: 10
New: 3
This week's total projects: 10

Maybe 10 is the magic number for me?  I seem to keep winding up with ten WiPs every week.  Hmm...

Don't forget to go visit the official WiP Wednesday linky at Freshly Pieced to see what everyone else is up to this week.  Happy WiP'ing to you!

Welcome! I'm Elizabeth, mom to a mood teen boy and a chatty six-year-old girl and I sew for my sanity. Let's get to quilting, shall we?
The Epic Sampler BOM Club kicks off Oct 1st
Copyright 2010 by Elizabeth Dackson. Powered by Blogger.

Search This Blog

Archive

Tutorials

 photo Icicle-Star_zps7f032133.gif  photo Boxed-In2_zps800ae9da.gif EasyPeasyFauxZigZag StringHeartBlock StarCrossed CrossMAze CathedralStar RainbowRing DoubleFlip PatchworkWheel FriendshipOctogon FlyingGeese HST Weathervane MarinersStar StackedScrappyBlock ScrappyAngles HolidayPresentBlock DivideandConquer CharlestonFarmhouse ModernHalves ModCircuitry ModNine Kaleido SlicedCoins Kaleido BellaCrossing SweetGirlie MiniBookshelf ClamshellLoop DoubleHourglass BaptistFan TetrisMug StringDiamond ScraptasticTote OffsetDiamonds MunchkinSoftBook PatchworkBathMat