Friday, February 25, 2011

Let the sun shine...also known as my 100th post

It's my mother's birthday this week.  If you ask her, she's turning 27.  She's been 27 pretty much since my now 45-year-old brother was born, so there's really supposed to be quite a few more candles on her cake, but that's neither here nor there.  My mother is one of those people who collects things - she collects sun faces.  She has an entire wall of them at this point, with over 40 various pieces.  Some are works of art, some are plates or pottery pieces, some are needlepoint, some are metal - it's a really vast kind of collection.  I wanted to contribute, but since I didn't see myself taking up metalwork any time soon, I wanted to sew her something.

Then, I saw Lee's tutorial at Fat Quarterly, and it was perfect.  Have you seen it yet?  Hop on over to FQ right now, because this pillow will surely make your day!  Make sure to leave a comment, too.  :)  Lee's tutorial was super easy to follow, and quick, to boot - I finished this pillow in just a few hours!


I kept the quilting very minimal and simple, because my mother claims that she's not a big fan of quilts.  I really loved putting this pillow together, and I can't wait to give it to my mother for her birthday!


Happy birthday, Mom!

I'm linking up over at Sew and Tell over at amylouwho today.  Hop on over, it's a great way to find some inspiration!

P.S. - This also happens to be my 100th post, so I'd just like to say thank you to all of you who follow my crafty exploits and share your thoughts with me.  Your comments and feedback make my day!
Wednesday, February 23, 2011

WiP Wednesday: #15

After a crazy week with lots of company and a little boy who's very much acting his age at the moment, I was super excited to get back to sewing.  Not a ton of new progress to share here, but I'm in the process of...

Finished projects:
Mom's pillow - stay tuned for a post on this one
Robot twin quilts
Birthday wonky 9-patch polka dot quilt

Still working on:
Single Girl quilt - Megan's piecing tutorial totally intimidated me on Monday.  Not that this quilt is rocket science or anything, but curves are something I haven't tackled before, so I was nervous.  Fortunately, I still had company from the munchkin's birthday so I couldn't sew just yet.  When I did get to sewing, I started by chain-piecing the first quarter of my rings.  I then promptly wound up with a migraine after I freaked out about a tiny math issue, thinking I needed 31 rings for this quilt...when I only need 20, made out of 31 different fabrics.  Did I lose you yet?  This is one seriously complicated quilt pattern, but so far, it's looking pretty awesome.


Urban Home Goods swap - The cathedral windows pillow got put on hold, with all the birthday festivities last week, but it's back on the fire this week.  I picked it up yesterday and made a darn good bit of progress, I'm almost done!  Still thinking on the second item to send along with this pillow.  Maybe a mug rug?  And for those of you who are curious, I am totally not hand-stitching these windows, that's Betsy 2.0 all the way here!


My fabric for {Sew} Beautiful - I'm totally waffling here.  Still.  I have enough AMH to make my spiderweb quilt idea work, and then some, but for some reason, I'm still thinking about my stash of MoMo's It's A Hoot.  At the same time, I'm still thinking about how I want a rainbow quilt, and I'm wondering if this ought to be it...and I'm compiling a seriously tall, leaning tower of possibilities in the process...


The backburner (for the moment):
Make Mine Modern
Margaret's Hope Chest

New projects:
Birdie Stitches BOM - Somehow, I totally spaced out on this block this month, and the month is nearly over. I'm hoping it might be easier this month, now that I'm not as much of an embroidery novice.

do.Good.Stitches March blocks - We got our block assignment for next month, and it's funny...it's a coin-style block, right up my alley!  In case you're curious, here's the tutorial for it.

WiP Wednesday #15 Recap
Finished: 3
In progress: 5
New: 2
This week's total: 7
Tuesday, February 22, 2011

Stacked Robot twin quilts

First off, thank you all for your birthday wishes for my little munchkin!  He had a wonderful birthday, was super proud to announce to everyone who asked that he was indeed 3, and made out like a bandit.  We had a huge family gathering at my house to celebrate and he had a fantastic time.  The new quilt has made it to his bed and seems to be quite snuggly.


There's another new pair of twins in the world receiving some quilts from me - two cute little boys, Cameron and Hunter.  Needless to say, I've got no shortage of cute fabrics for little boys, including a ton of leftover fabric from the twin quilt I made last year for my son's big boy bed, so I raided my stash, paired it with some Kona solids, went to town, and came up with my 4th and 5th quilt finishes of the year.  Must keep the momentum going...


These quilts were incredibly easy to piece together, I went with a simple stacked coin-style quilt, using different sized coins and extra wide sashing strips.  Some of the coins were fussy cut, but most were actual scraps from the twin sized quilt.  This quilt was made 110% from my stash, which was a nice surprise.  It's so nice to have things organized and be able to shop at home!


I tried to give the quilts a little bit of unique personality, though I worry that I didn't make them unique and different enough from each other.  The backs are totally different, however, thanks to some super bright Kona solids I used.  I'm really feeling solids at the moment, I totally see an all-solid quilt in my future.


Quilt Stats
Name(s): Stacked Robots for Cameron and Hunter
Size: 52" x 56" (each)
Fabrics: David Walker's Robots collection, as well as some random Heather Bailey's Bijoux, Lizzy House's Castle Peeps, and Moda Marble Dots for the binding
Quilting: All-over meandering stipple


I'm linking up today with Fabric Tuesday over at QuiltStory.  Hop on over to see some other recent fabric finishes!
Sunday, February 20, 2011

Happy 3rd birthday my little munchkin

How is it possible that you are three years old already?  Wasn't it just yesterday that you came screaming your way into our lives?  Where did the time go?


I can't believe that over 1,000 days have passed since you entered our lives.  It's hard to remember what life was like before you came along.


This year, you asked me to make many things for you, but for your birthday, you asked for specifically for a polka dot blanket.  Ask for a quilt, and a quilt you shall receive, my little boy.  I sure hope you like it.


This quilt was so much fun to put together!  I was inspired by both Sarah, with her stringy polka dot quilt, and Megan, with her crazy 9 patch quilt.  At first, I worried that I wouldn't have enough polka dot fabrics for a whole quilt of them, but sure enough, I had plenty - and a bunch to spare, too!  I went kind of crazy with the wonky 9-patch blocks.  I made a bunch of them, at first intending to make a twin size quilt, but I ultimately scaled it back to a 71" square quilt.


I think I'm glad I scaled it back to a big square instead of the twin size.  He's got a twin-size quilt already, and this will be a nice companion that he can drag around the house if he wants to snuggle with it on the couch or he can add it to his collection of quilts and blankets in bed.  On the bright side, as I finished the binding on this quilt, I started to feel like I finally gotten a good handle on the technique of hand-stitching the binding on.  I used milliners for the first time, and I must say, that made a huge difference for me.  They were so much easier to manipulate the way I wanted to.  Two thumbs up!


Quilt Stats
Name: A Legion of Dots
Size: 71" square
Fabrics: Various polka dots all from my stash, sashed with Kona Ash and Kona Ocean.  The binding is from Riley Blake's Colorful Chrismas collection.
Quilting: All-over meandering stipple.  I had thought about straight-line quilting this one, but time wasn't on my side here.  I'm a lot more confident with my stippling, so I tend to move a lot faster that way.

I'll be linking this finish up with {Sew} Modern Monday this week.

{Sew} Modern Monday at Canoe Ridge Creations
Friday, February 18, 2011

Sliced Coins Quilt Along: Gallery of Finishes


Sliced Coins Quilt Along
Week One: Introduction & Materials
Week Two: Cutting Instructions
Week Three: Assembly
Week Three point five: Sashing
Week Four: Quilt Backs, Quilting, and Binding
Week Five: Gallery of Finishes

First off, can I just say a big thank you to all of you who have participated in the Sliced Coins Quilt Along so far??  This quilt along has been so much fun, and I hope you've enjoyed quilting along with me, too.  I am so excited to see your finished quilts!

Do you have a finished quilt yet?  You do?  High five!  Link it up below for a chance to win a $25 gift certificate from Sew Fresh Fabrics as a special thank you for participating in my first ever quilt along.

If you're not all finished just yet, that's A-OK, this drawing will be open until 2/27, so you've still got some time to wrap it up.  Come on back over and link up as soon as you're done, and I'll announce a winner first thing on 2/28.  Good luck!

Wednesday, February 16, 2011

WiP Wednesday #14

In totally random news, whilst trying to deal with the stress of potty training over this last week or so, I managed to get so thoroughly frustrated with the lack of organization in my stash, that I got to work changing that.  Angela's tip about comic book backing boards as mini-bolts was spot-on, and my stash looks so pretty and organized now!  Jeni has been doing an awesome series on her blog about stash organization as well, which has been thoroughly educational.  I even refolded every one of my fat quarters and now I feel like I have a much better handle on what's in my stash.


And now...for the weekly works in progress round-up...

In Progress:
It's been hand-stitching city over here the last several days.  I think my machine is getting jealous, and my my hands are definitely getting sore...


Robot quilts - One quilt is fully done, but I'm still working on finishing the binding on the other one.  We've got company coming for my son's birthday tomorrow, so I suspect hand-stitching will be the the only progress I'll be making over the weekend...


Munchkin's polka dot quilt - Almost done, just another few feet of binding left to hand stitch!  Here's a sneak peek at the binding I'm using...


Single Girl king size quilt  - I'm so glad that I joined the Single Girl Support Group, it's making me actually get moving on this quilt!  I've cut my fabrics into strips and I'm starting to trace my templates onto my fabrics.


Urban Home Goods swap - I've started on my first cathedral windows pillow, thanks to Heather's tutorial and some encouragement from Brooke, and so far, it's going really well!   I feel like a pre-teen again, folding one of those fortune tellers that I used to make with my friends in middle school.


{Sew} Beautiful Bee - my turn - I'm kind of stuck here.  I keep going through my fabrics, and I keep coming back to my stash of It's a Hoot.  At the same time, though, I really loved my test spiderweb block, with all of the Anna Maria Horner fabrics, so I'm trying to figure out if I have enough in my stash to do a whole quilt like that.


Pillow for Mom's birthday - I'm running out of time here!  I've got to finish this by Sunday, so I better get a move on.  My mother collects sun face art, so I'm going to be making a cool sun pillow with some of my newly discovered yellow stash.


Waiting in the wings:
MHC quilt for Kayla
Make Mine Modern swap
String Me Along February block


WiP Wednesday #14 Recap
Last week's total: 9
Finished: 0
New: 0
This week's total: 9


And finally, a gratuitous cute picture to get you through hump day...another use for mug rugs - dog pillows!


Monday, February 14, 2011

Time to get spicy...

I headed to the post office last week with my Spicing Up the Kitchen swap package.  I've totally felt like I've been thoroughly see-through and that if my partner was trying to figure out what items are hers, she would know these are for her, but that's half the fun of swapping, to me - guessing what will be coming to your door...

Anyway, we were to make two items for this swap, a big and small item, and I think I sort of made two big items.  I didn't mean to - as soon as I Flickr-stalked my partner, I just knew that I needed to make her an apron and a runner, and I couldn't stop myself.  I was so excited when I got my partner for this swap - I got Kati of From the Blue Chair!  Don't worry, I'm not letting the cat out of the bag, she got her package over the weekend, and it seems that she's super happy with it.  Yay :)

This apron was super easy and adorable.  I first spotted it at Traci's blog, and I started with the same tute she used, but I kind of improvised after reading it.  I love these fabrics I used, they're so fun!  If these don't spice up her kitchen, I'm not sure what will.  They make me smile every time I see them - then again, just about all of Heather Bailey's fabrics tend to have that effect on them, especially these Pop Garden prints.


I also made her a table runner, based around three wonky square-in-square blocks.  I am not normally a fan of this color palette, but I really like these colors here in this runner, they're really fun.  I stuck with simple straight-line quilting here, aiming for a simple, yet sophisticated kind of look.  I'm really happy with how this runner came together.  When I got ready to make the back, I wasn't sure at all what I wanted to do, until I realized I had a ton of yardage left from the citrus Sanctuary print.  I knew that would tie the whole runner together, front and back, so I went super simple on the back.  I really like how the simple back lets the quilting shine through.


I can't wait to get a package of my own in the mail!  My partner still has a few more weeks before the deadline, not to worry.  I have no clue whatsoever who my partner might be, so I'm super excited to see what comes in the mail for me...

I'm linking up with {Sew} Modern Mondays over at Canoe Ridge Creations today, and I can't wait to see what everyone else has been making.

{Sew} Modern Monday at Canoe Ridge Creations
Friday, February 11, 2011

It's pillow time!

Did you hear about Pillow Month over at Sew Mama Sew?  There's a special reason why I'm excited...


I think you all know how much I adore making pillows...

Sew Mama Sew is even having a fantastic pillow contest, too and there's still time to enter!

And guess what's even more awesome about Sew Mama Sew...


I'm guest posting over there today!!!  So go check it out and tell me what you think of my very first pillow tutorial!


This pillow was so much fun to make, combining my newfound love for paper piecing and some of my favorite fabrics in my stash.  Every time I see it in my sewing room, it makes me smile.

I'm linking up with Blogger's Pillow Party this month.  Have you checked it out yet?  It's so much fun and oh-so-very inspiring!

Blogger's Pillow Party

Sliced Coins Quilt Along: Backings and Quilting

This is the final week in the Sliced Coins Quilt Along.  Have you had fun?  I sure hope so, I know I have.  I'm so proud of all the amazing finished quilt tops I'm seeing for the quilt along!  It makes me so happy to see how many people are participating and how much they're enjoying this quilt pattern.

A part of me really likes making quilt backs, trying to use up scraps from the quilt top and making them work in a new way.  Another part of me dreads making quilt backs, because sometimes it feels a little bit tedious to me.  I've done a lot of different things for quilt backs in the last year and I've also seen a ton of awesome ones on Flickr - here's some of my favorites for inspiration.


Since you more than likely have extra coins, I went ahead and did some math for you all for a quilt back, to use up those excess coins and make a scrappylicious kind of quilt back.  I've also PDF'd the instructions for you, to make things even easier, just click on the picture below to access the PDF.


Now that you've got a quilt back, it's time to baste and quilt!  Basting is my least favorite part of quilting!    Jennifer wrote a really comprehensive basting tutorial during her quilt-along last year - That Girl...That Quilt's Basting tutorial - and I highly recommend it.

As for quilting, I'm more of a free-motion kind of girl.  Don't get me wrong, I like straight-line quilting, but free-motion quilting is relaxing to me.  I would be perfectly happy putting my earbuds in, turning on my iPod, and free motion quilting all day.  That sounds quite awesome, actually.  I learned to free-motion quilt from Elizabeth Hartman's quilt patterns, they're very thorough, but the basic gist is this - practice the motif you want to quilt (i.e. loopy, stipple, circles, etc.) on paper first.  Practicing on paper is really helpful, even if it feels a little silly.  Randi wrote a fantastic free-motion quilting tutorial last year that will really help you free-motion, if it's your first time.

If you're interested in straight line quilting, there's two great tutorials to see - Amy's simple straight-line quilting tutorial and Katy's wavy quilting tutorial.  Both are very beginner-friendly.

I can't wait to see how these quilts turn out!  In fact, I'm so excited to see these quilts finished up that I'm going to hold a giveaway for those of you who finish your quilts!  You'll be able to enter in the giveaway linky starting next Friday 2/18 and ending on Friday 2/28.  I'll be giving away a gift certificate to Sew Fresh Fabrics for $25 to a lucky random winner.  Thank you, Peg & Becca!


Need some fabric now?  They're running an awesome free domestic shipping special for orders over $35 right now until 2/14 to share the Valentine's love!

P.S. - I entered my finished Sliced Coins quilts in the awesome Love Nest quilt show over at Gen X Quilters - go check it out and vote!  If you want to vote for me, I'm #11, but there are a ton of awesome quilts to see, so hop on over and see for yourself :)
Thursday, February 10, 2011

Sliced Coins Quilt Along: Let's see those quilt tops!


How are you guys doing with the quilt along?  I've seen a lot of finished quilt tops popping up on Flickr, so let's share them all here.

And stay tuned tomorrow for a quilt back pattern, as well as some tips and tutorials on quilting and binding.  There will also be a nice surprise in tomorrow's quilt along post, so make sure to check it out!

Wednesday, February 9, 2011

WiP Wednesday: Lucky 13!

Is it truly pathetic and over-neurotic of me that I have actually written a sewing schedule for myself for the rest of this month?  I totally think so.

It just feels like there's so much to do this month, and it's February, so it's short.  February also means it's my son's birthday and my mother's birthday.  My husband's best friend from childhood, who is also my son's honorary godfather, always comes to visit for a week or so for the munchkin's birthday, so that also means I've got company this month.  I'm in the thick of potty training at the moment with the munchkin, too, which has been...well...not my finest moments in my parenting career, to say the least.  I think we've rounded a corner at this point, things are going well, but it's still a little stressful and we haven't left the house much.  You'd think that would bode well for my progress, but not so much.  And there are too many projects that simply must be finished this month!!  Two of my swaps are due to be sent at the very beginning of March...my month in the {Sew} Beautiful Bee is March, so I have to get ready...those twin boys are about to be born any day now...it's beginning to feel a lot like Christmas, in terms of the time crunch, so yes.  I made a schedule.

So far, it's been insanely helpful in warding off my notorious quilty-ADD.  I've gotten a lot done since the last WiP Wednesday, so maybe being over-organized is (while being awfully dorky) kind of helpful for me...

Finished:
3x6 bee blocks


{Sew} Beautiful block for Emily


do.Good.Stitches blocks
Spicing Up the Kitchen swap package - stay tuned for a post!
SMS Tutorial - stay tuned!

Making serious progress:
Munchkin's birthday polka dot quilt - He announced at the post office last week that I was making him a polka-dot quilt.  I had kind of thought he'd forgotten about it, so it was nice to hear.  All the blocks are made, the top's done, now I need to quilt like a madwoman after I make the back.


Margaret's Hope Chest quilt for Kayla - I've changed my mind about the design of this quilt.  Instead of going with the Blockapalooza quilt, I'm going to do either a colorbrick quilt or a modified bento box quilt, I can't seem to decide.  I worry the bentos might be too modern, so I may stick with the simple colorbrick style.  Fortunately, I have several hours of quilting ahead of me to think it over.
Robot twin quilts - The backs are made, I just need to baste and quilt these guys!  I plan to have a few days here of nothing but quilting so I can get these done.

Zero progress:
Make Mine Modern swap
Urban Home Goods swap
Single Girl king size quilt

New projects:
My {Sew} Beautiful blocks - I've decided on a block, but I'm still debating on the fabrics.  I'm going to be asking for a spiderweb block paper pieced, but rather than piecing them together like spiderwebs, I'm going to sash them all, so they look like really cool stars.  I was even thinking of asking my awesome bee girls if they'd be interested in doing a reverse spiderweb block for the quilt back.


Pillow cover for my mother's birthday
String Me Along February block

WiP Wednesday #13 Recap
Finished: 5
In progress: 6
New: 3
This week's total: 9
Tuesday, February 8, 2011

Block Party: Traditional Spiderweb Block

I've officially decided to ask the awesome ladies of the {Sew} Beautiful Bee next month to make me some spiderweb blocks.  I plan to sash them, so they look more like star blocks than spiderwebs.  I found a bunch of different tutes for this block, but ultimately, I went the paper piecing route, with an awesome tute at Quiltville.  It was super easy to follow, and I really enjoyed making this block.


I used up a bunch of Anna Maria Horner scraps and threw in a few Parisville strips for good measure.  I'm not sure what this block will be when it grows up, since I don't have anywhere near enough AMH scraps to do a whole quilt this way.  I can't seem to decide what colors I want to work with for my bee quilt, so this will wind up either turning into a pillow or a mini quilt.

I'm entering this block in QuiltStory's Block Party, in the Traditional category.  Go check it out, there is some serious inspiration over there!!


Fresh Poppy Design
Monday, February 7, 2011

Block Party: Modern Sliced Scrappy Block

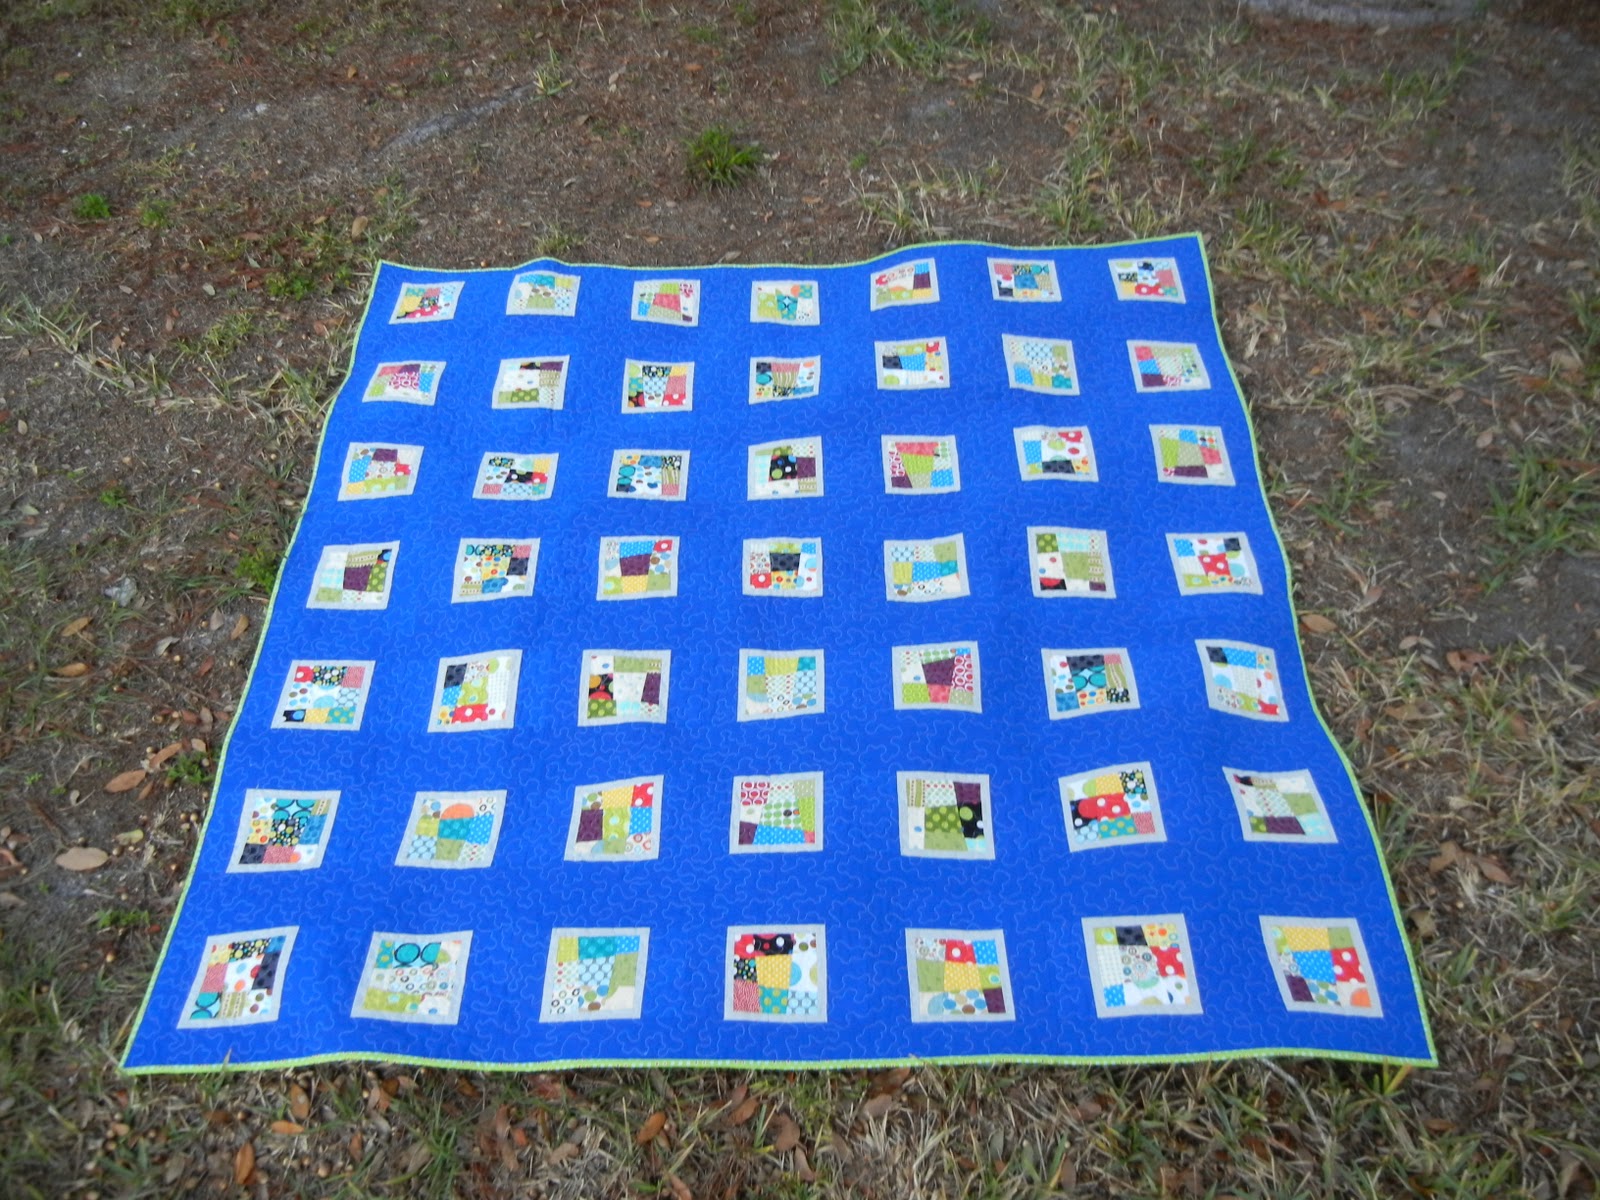
Last week, I worked on finishing up all of the blocks for my girls in my 3x6 beehive.  It was a ton of fun, and I decided that these blocks wound be great for a tutorial.  They're fantastic scrapbusters, and look awesome in lots of different colorways.  See what I mean?


For one 12.5" block, you'll need:
Various scraps as small as 1.5" square
2 - 1" x 8.25" strips of white (or another neutral solid)
4 - 1" x 8" strip of a contrasting neutral (I used Kona Coal)
2 - 3" x 12.5" strips of white
2 - 3.5" x 8" strips of white

1. Decide on your color scheme for your block(s).  Gather a bunch of scraps in varying sizes - they can be as small as 1.5" square.


For each block, lay out your scraps (and cut them down as necessary) in three sets of approximately 10.5" long strips.


2. Sew your strips together, chain-piece style, and make sure to press well.


3. Once you've pieced your patchwork rows together and ironed them, lay them on your cutting mat and trim them down to 8 1/4" wide.  Don't worry about whether or not the seams match perfectly across the top of your strips, we're going to fix that in a moment.


4. For your top row, do trim the top to make sure it's good and straight, all the way across.  Then, make a nice, wonky cut across the bottom of the strip.  Try to keep the strip at least 1.5" long at the shortest.  Then, add a skinny strip of white (or another neutral of your choice) to the bottom of the strip, where you made your wonky cut.   Press well.


5. For your next cut, you'll be making two wonky cuts - one on the top and one on the bottom.  Try to match the angle of the wonky cut at the bottom of your first strip for the top of this second strip.


Then, get creative with the second wonky cut.  Attach a skinny strip of your white sashing to the bottom of the strip.  Press well.  Then, attach both sashed strips to one another and press well.


6. Lay your finished strips on top of your remaining strip of patchwork.  Again, try to match the angle for this wonky cut.  Don't worry about the bottom of the strip for now - we'll straighten it out in a moment.  Attach this newly wonky strip to the white sashing at the bottom of your joined patchwork.   Press well.


8. Now, let's trim the bottom of this patchwork block.  Feel free to improvise here, but I trimmed my patchwork to 6" long and 8" wide.


9. Add your strips of contrasting sashing all the way around your block.


10. Trim as necessary before adding your white (or neutral) sashing - your 3.5" strips should go on the top and bottom and the 3" strips should go on the left and right sides of the block.  Add your white sashing all the way around, and press well.


11. Trim your block down to a finished 12.5" size.


I'm off to the post office today to send these blocks in the mail to the girls in my beehive.  If you make a block (or two, or even a whole quilt!), make sure to let me know - I'd love to see it!

I'm sharing today at {Sew} Modern Mondays at Canoe Ridge Creations and also at the awesome block party hosted by QuiltStory's Heather and Megan.  I'm entering this group of blocks in the Modern category.


Welcome! I'm Elizabeth, mom to a mood teen boy and a chatty six-year-old girl and I sew for my sanity. Let's get to quilting, shall we?
The Epic Sampler BOM Club kicks off Oct 1st
Copyright 2010 by Elizabeth Dackson. Powered by Blogger.

Search This Blog

Archive

Tutorials

 photo Icicle-Star_zps7f032133.gif  photo Boxed-In2_zps800ae9da.gif EasyPeasyFauxZigZag StringHeartBlock StarCrossed CrossMAze CathedralStar RainbowRing DoubleFlip PatchworkWheel FriendshipOctogon FlyingGeese HST Weathervane MarinersStar StackedScrappyBlock ScrappyAngles HolidayPresentBlock DivideandConquer CharlestonFarmhouse ModernHalves ModCircuitry ModNine Kaleido SlicedCoins Kaleido BellaCrossing SweetGirlie MiniBookshelf ClamshellLoop DoubleHourglass BaptistFan TetrisMug StringDiamond ScraptasticTote OffsetDiamonds MunchkinSoftBook PatchworkBathMat