Wednesday, May 28, 2014

Drop Dead Gorgeous - a new paper piecing pattern!

Sometimes the stars align for a quilt block to turn out really awesome. This was one of those times...
DDG Epic Mini for Kristi - detail 1
After The Stash Bash, I joked with Kristi of Schnitzel & Boo that I would love for her to make me a Cargo Duffle. Some fun banter ensued, and we decided to do a fun little swap amongst ourselves. Except with both of us being pretty creative people, we both decided to make up a draw up fresh, original patterns for each other.
DDG Epic Mini for Kristi - detail 2
Sometimes, I take my computer to my son's gymnastics classes. Inevitably, I find myself fooling around in Electric Quilt, coming up with "someday" patterns and such, but two weeks ago I came up with something I couldn't shake. It was one of those things that I couldn't stop thinking about and had to make. Right away. So for the last week, I've been working on a this new block, which I'm calling Drop Dead Gorgeous.

After designing the block, I decided it would make a great mini for Kristi's sewing area, so I asked her about her favorite colors. She described her favorite colors as "girly but edgy," and I knew exactly what fabrics to go for in my stash...
Drop Dead Gorgeous Epic Mini for Kristi
And I got right to pressing and cutting. And measuring. And sewing. And ripping a lot of paper :) I quilted it using some assorted matching Aurifil 50 wt threads in white, gray, fuchsia, and lime green, and I love the texture that shows through on the backing.
DDC Epic Mini for Kristi - fmq detail
Every little bit of the work was worth it because I just adore how her mini turned out, and I think she's pretty happy with it too, now that it's arrived at her house safely.
DDG The Epic Mini backing
The pattern is now available via my Pattern Shop as well as Craftsy. Even if you've never paper pieced before, you can tackle this pattern. Yes, there are a lot of pieces of fabric involved (124 pieces, to be exact), but it's broken up into bite-size, manageable chunks that you can do. And if you're an experienced paper piecer, you can totally rock this pattern. The eleven page pattern is for a 16" block, and includes all of the cutting instructions, piecing instructions, colorful photographs and diagrams to assist you in your piecing, as well as line drawings of the block where you can experiment with your color placement to find the right mix of colors that makes you excited to work on this block.
Drop Dead Gorgeous Block - now available!
Kara and Lisa sewed through this pattern for me to test it out over the long holiday weekend and they both made fabulous blocks!
Lisa's Drop Dead Gorgeous Block
Lisa's bright and beautiful block

Kara's Drop Dead Gorgeous block - turned pillow
Kara's fun Drop Dead Gorgeous pillow

If you make something using this pattern, please do share it with me! You can share it with me on Flickr in my Flickr group or on Instagram by tagging me (@dontcallmebetsy) or using the hashtag #dontcallmebetsy
Drop Dead Gorgeous layout ideas
Happy Wednesday everyone!
Tuesday, May 27, 2014

Quilty people are totally the best people

Whenever I go to an event like The Stash Bash, I come away not only feeling refreshed and happy, but confident in knowing that quilty people are truly the best people. I meet so many friendly faces, welcoming and kind, understanding and affable, and often truly hilarious. Sometimes meeting your Instagram and blog friends can be awkward, but with quilty people, it's just like picking up a conversation you were in the middle of when you last chatted. If you haven't been to an event like this before, I really can't recommend it enough. There's two similar events that I know of that are coming up, in case you're interested: Sew OK and Sewtopia. Both events still have tickets available, so if the timing and location works out, I say go for it!! You won't regret it :)

The Stash Bashians - 2014

Nothing like being silly with huge scissors

It didn't really happen if you don't Instagram it, right?

Real friends help carry that king size quilt top

All smiles when you make IG friends into IRL friends
One of the fun side benefits of having quilty people for friends is setting up fun personal swaps with them. Have a friend that you admire that makes garments? Offer to make them something in exchange for them making something for you! I love bags, and while I enjoy the process of making them, I know that I'm kind of terrible at it. So when I jokingly suggested a swap with Kristi recently, she went for it. She's going to make me a cool bag, and I made a super awesome mini quilt for her that should be showing up at her doorstep today, using a new pattern that will be coming out right here tomorrow. If you liked my Showstopper quilt block pattern, you're going to love Drop Dead Gorgeous! Here's a few sneak peeks to tide you over - and make sure to come back tomorrow to see more :)

Drop Dead Gorgeous Sneak Peek #2
 
Drop Dead Gorgeous Sneak Peek #1
Monday, May 26, 2014

Boxed In - a quilt finish!

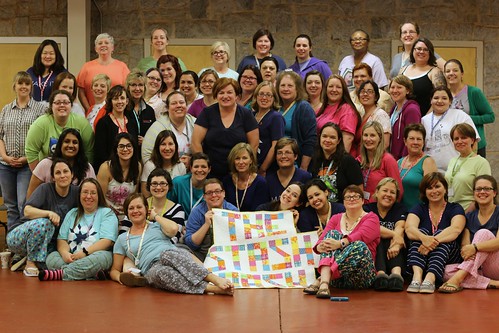
Happy Memorial Day to you! I hope you're having a great weekend so far, celebrating family and those who've served our country. I'm stealing a few minutes of quiet independent reading time to put together a quickie, long-overdue blog post for a recent finish - Boxed In!
Boxed In - a quilt finish!
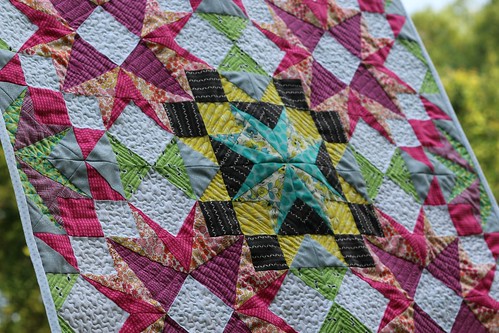
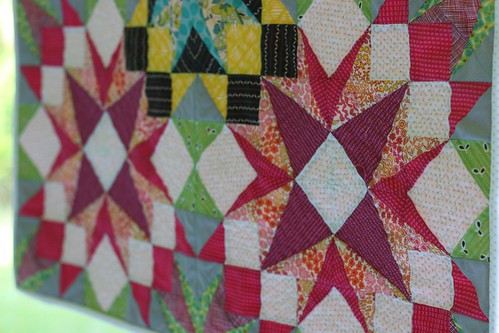
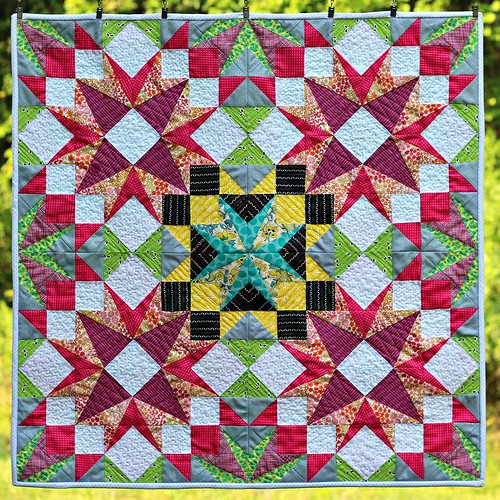
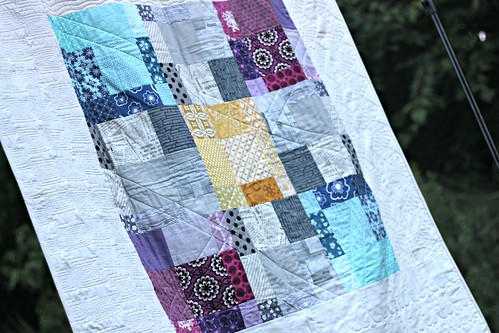
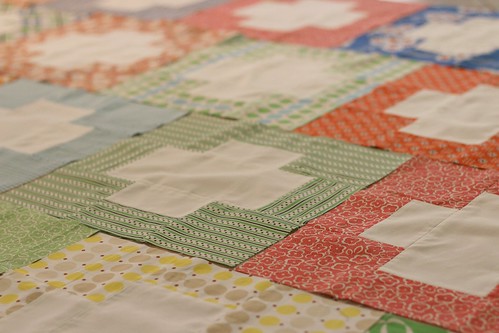
Boxed In is a twist on a traditional nine-patch block applying a change in scale as well as playing around with the symmetry of the nine-patch. There's two layers of nine-patches going on here, as well - a giant nine-patch block, which is built of asymmetrical nine-patch blocks. I will be writing a pattern for the asymmetrical nine-patch block itself as well as some ways to utilize it coming up soon, so stay tuned for that.
Free motioned L's on the Boxed In quilt
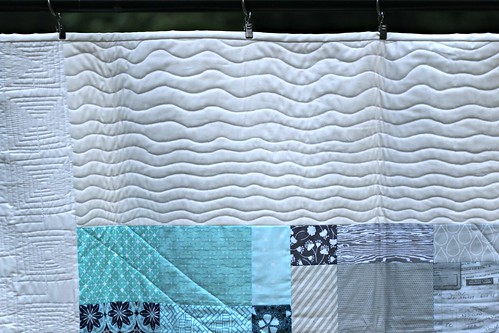
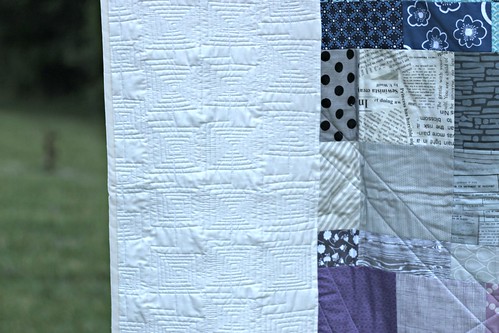
I dug into my scrap box for this quilt, not only with the prints, but with the whites as well. I used four different shades of white, log-cabin style, around the giant nine-patch block. I so often ignore my scraps of white because it's tough to match them up, but I actually like the subtle tonal changes of white throughout the quilt, so I will definitely try that again on another quilt in the future. My favorite of the nine-patch blocks is positively the center one, with the yellows and golds. It brings a nice spot of sunshine, and attention, to the center.
Boxed In quilt finish - a twist on a traditional 9 patch
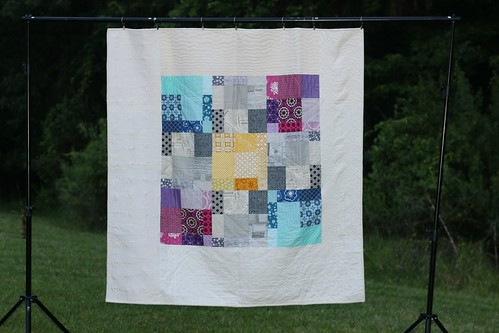
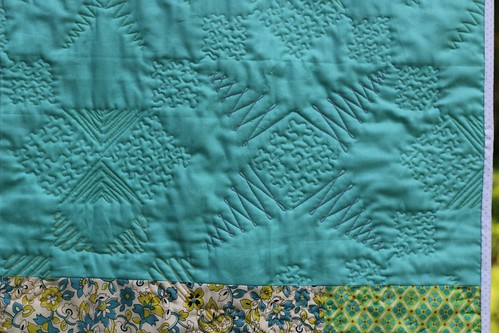
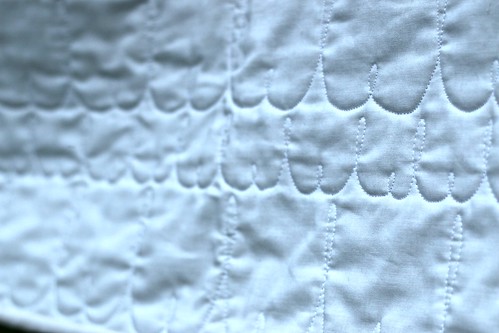
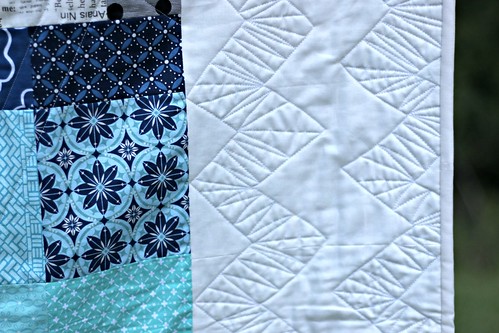
I got a little crazy with the quilting on this one - with my trusty favorite shade of Aurifil white #2024, I used a different quilting style in each of the four white logs. There's some wavy lines, some zigzag, some Ls, and some boxes. In the nine-patch area, though, I went super simple, with some random straight lines. I think it gives some really interesting texture to the finished quilt. I kept the binding really minimal as well, using one of the white fabrics I used for the logs. I like the blended look that it gives to the finished quilt. I often choose a binding that's got a lot of contrast, but I'm really digging how soft a matchy-matchy binding looks. I might just do this kind of binding a bit more often :)
Free motioned boxes on the Boxed In quilt
Quilt Stats
name: Boxed In
size: 50" square
pattern: Asymmetrical 9 Patch, coming soon
fabrics: assorted whites, assorted scraps in purple, aqua, gray, and gold
quilting: wavy lines, zigzags, L's, boxes and straight-lines, all free-motioned on my Juki with 50 wt Aurifil #2024
Free motioned zig-zags on the Boxed In quilt
Now, I have to confess something: I lost this quilt for a bit of a while. About two weeks, to be exact. It traveled safely to a few lectures with me, and then when packing up for my last trunk show, I couldn't find it. If you've read my blog before, you probably know that I am really good at "putting things away" and by that I mean, putting things in places that make zero sense. I inherited that lovely trait from my dad, who we called the "Mad Mover." At first, I fretted that I left it behind at one of my lectures, but that wasn't the case. I tore my sewing room apart looking for it, as well as my guest room, where I store many of my quilts. All with no luck. It wasn't until this past weekend that I decided to unfold quilts as I looked through them to search for this quilt that I found the darned thing. It was folded with the backing side out, and I didn't remember using that particular print for the backing, so I looked right past it before. Thank goodness I found it, because I was seriously thinking I might have to remake it - which wouldn't be a tragedy, but gosh, it sure would be frustrating to have to remake something I misplaced!
Free motioned wavy lines on the Boxed In quilt
Monday, May 19, 2014

Quick Quilting Tip - Finger Pressing

Happy Monday to you! I hope you had a great weekend :) Today, I'm sharing a super simple quick trick as part of Amy Smart's Quick Quilting Tips & Tricks blog hop to celebrate the release of her new book Fabulously Fast Quilts ! It's a simple trick that I use every day in my sewing room: finger pressing!


As a little girl, one of the girlie things I got into early on was nail polish. I actually got into some serious hot water one afternoon when I spilled half a bottle of glitter nail polish all over my mother's formal living room coffee table. My older sister was supposed to be watching me, but she didn't see me make a bee-line for her glitter nail polish, not until it was too late. My obsession with nail polish continues to this day - while I may be lax about getting my hair cut, I like to take care of my fingernails. Always have. I get manicures regularly, it's my "me time" - and I've found that in sewing, it's super handy to have my nails well taken care of, because I can put them to use finger pressing.


Do you finger press your seams? I'm a frequent finger presser. In paper piecing, there's a good bit of pressing involved - really, you ought to press every single seam you make with a nice, hot, dry iron. I do a lot of paper piecing, and I often cheat with my seams, finger pressing them rather than pressing them with the iron, if I'm waiting for the iron to heat up, or if I'm just being lazy, which happens frequently in my sewing room.


Finger pressing also works great for speeding up regular pressing. I often press assembly line style, laying out a bunch of pieces to be ironed all at once. This process is made way easier by finger pressing the seams first, so that I don't have to spend any time setting up the seam to be pressed. It works well for both side pressing and open seam pressing, so you can do whatever floats your boat.

If you aren't one for having longer fingernails, you can still take advantage of finger pressing using a notion called a Finger Presser. It's a little wooden tool that you can use in lieu of a finger nail to finger press your seams. In one of my recent paper piecing classes, I met a student who bites her finger nails and swears by her finger presser because her finger nails are never long enough to put to work in this way.


Also today, you can listen to me chatting with the wonderful Pat Sloan on her weekly American Patchwork & Quilting podcast - it's always such fun to chat with Pat, and this time we chatted a bit about free-motion quilting, so check out the podcast at 4 o'clock Eastern time today right here/1 o'clock Pacific time. You can also check it out after the fact, as well as other past podcasts right here. Pat's show is great to listen to while you're sewing, so make sure to check it out!

Wednesday, May 14, 2014

Sewing with the munchkin for Mother's Day

Life's been busy lately. Not in a bad way, just busy...to the point where when my son's kindergarten teacher sent home a note about how her last day of school is approaching quickly before she goes on maternity leave, and it dawned on me that I had not made a baby quilt for her. Eek! It was on my To Do list, I had managed that much, but it just hadn't made it to the top yet, so this weekend I bumped it to the top of the list.

Threading the needle like a champ


I also decided it was high time that I let my little guy do a little bit of sewing. He really wanted to be involved in the baby present for his teacher and when I pitched the idea of making a quilt together, he was totally into it. We picked out a pattern he liked, my Xs and Os quilt pattern, and got to work, picking out fabrics. He's always liked to play with fabric, from arranging form scraps on my design wall to helping me pick out fabrics in fabric stores, so it was a lot of fun to dig through fabric with him and talk about it. In digging through my novelty prints, we found a boatload of boy prints from Children at Play, Sarah Jane's first collection for Michael Miller a while ago, and a print from Castle Peeps that played nicely with it. Then we picked out some nice solids to balance things out, Kona Leprechaun and Moda Bella Sunshine, and I got to cutting. I did all the pressing and cutting, because he's only six, so I'm thinking a lesson on rotary cutting is a bit of a ways off just yet.

Sewing away!

We got started sewing Saturday afternoon, and worked on O blocks. Because my sewing table is so tall, I used some scrap boxes to raise up my foot pedal so he could reach it easily. We talked about right sides together, and keeping the fabrics lined up nicely, and even chain piecing. He had a great time and was super proud of himself. I couldn't stop smiling as I watched him progress...

First block done!

Not surprisingly, after a few blocks, he wanted a break, and if I'd managed to plan this gift far enough in advance, I would've set the blocks aside and picked them up at a later date, but since his teacher's last day is this Friday and he promised that he'd bring her the quilt on Monday, I kept working, just doing the stitching and flipping on his behalf. 

Having fun with block layout

I saved the straight seams for the kiddo, and let him go to town on them. He really liked the sound my Juki makes when it goes fast, but the super fast speed was a little much for him, so he kept his pressure on the foot pedal pretty light...until he was ready to clip the threads. He'd scoot his foot over to the big red button on my foot pedal and slam his heel on it, which he thoroughly enjoyed doing. 

Soon some tiny toes will be hiding under this quilt

We sewed the top together in record time, quilted it up and bound it, and brought it into school with us yesterday morning. His teacher was so thrilled, and I could tell the kiddo felt mighty proud of the gift we were giving. I'm so proud of this little quilt and what it represents. It was positively the perfect way to spend Mother's Day weekend! I hope you had a wonderful weekend as well!

Xs and Os quilt - his first quilt

Quilt Stats
name: Miss Seymour's Xs and Os
size: 36" x 48"
pattern: Xs and Os quilt pattern by yours truly - newly refreshed and updated!
fabrics: Children at Play prints by Sarah Jane for Michael Miller Fabrics and Kona Leprechaun and Moda Bella Sunshine
quilting: simple meandering stipple in white (#2024) Aurifil 50 wt thread

Xs and Os quilt for the teacher - all finished!
Wednesday, May 7, 2014

Guest posting at Sew Mama Sew today!

I'm super excited to tell you that I'm going to sharing over the next few months at Sew Mama Sew - it was one of the first blogs I ever guest posted on several years ago, and I love how much information they've cultivated there over the years! I'm posting the first in a series of posts about free-motion quilting over there today, Top 10 Tips for Beginning Free-Motion Quilters. If free-motion quilting has gotten the best of you in the past or if it's been something you've been hesitant to try, check out my tips for getting started on the right foot, and remember that your attitude will make or break your early experiences with free-motion quilting.


When I first started free-motion quilting, I didn't know I was supposed to be scared of it, so I just went for it and did it. It wasn't perfect, and I knew it, but I didn't let that get to me. I focused on having fun with it, and over time, with lots of practice, my stitches got better and better. And yours can too!


You can check out my top tips right here, and if you want more free-motion tips, tricks, and examples, check out my Craftsy class and save $15 on your class registration right here - Start Free-Motion Quilting! If you're more of a fan of walking foot quilting, you can also check out Jacquie Gering's new Craftsy class, Creative Quilting with Your Walking Foot, which is just fantastic. Have a super day!
Monday, May 5, 2014

Weekend sewing...and a winner

How is it that Monday creeps up so quickly these days? And how is it possible that there's less than  month left of my munchkin's kindergarten school year? The days are flying by around here, and that's certainly in part to a good bit of secret sewing going on in my neck of the woods, and I'm sure the other part contributing to the fast pace of time is just life. It's amazing to me that it's already May, it feels like it was January just five minutes ago!

In any case, this past weekend was a good one, filled with some quality time with the kiddo and a fair bit of sewing as well, in spite of the horse fly that invaded my sewing room Friday night. Thankfully I was able to shoo the fly (no quilty pun intended!) and get some nice sewing done in peace. This little house block is heading off to Quiltmaker headquarters for a fun project they're putting together, and you can find the pattern in Volume 8 of their 100 Blocks series, block #783 designed by Lori Holt.

Home Sweet Home block for Quiltmaker

I even managed to do a little bit of selfish sewing this weekend, which was so nice. I started on this quilt back at The Stash Bash - I had decided before I left that the time had come for me to make a KJR (Katie Jump Rope) quilt. Making the first cut was a teeny bit painful, but it felt good to finally start using something I had loved and hoarded for so long. I decided that a simple block would be best, so I could have large chunks of the prints I love so much, and so that's how I wound up with this work in progress. I think I've made somewhere around 50-something blocks now, so I think I'll wrap it up and sew them together this week. For now, it's fun to play around with the layout.

Katie Jump Rope quilt in progress

And I owe you all a winner - the winner of Volume 9 of Quiltmaker's 100 Blocks issue is Michele! Congratulations, Michele, I'll be emailing you shortly to get your mailing info. Have a wonderful day today everyone :)
Friday, May 2, 2014

Quiltmaker 100 Blocks Vol 9

Quiltmaker has a new edition of their 100 Blocks publication hitting shelves soon - Volume 9! And Volume 9 is extra special to me, because it's the first magazine to publish my name on their cover. Eek! Look at that!! And not only that, my block is just to the left of my name. Can you guess which one is mine?


Yep, it's the rainbow one! My block, believe it or not, is a foundation paper pieced block, using an assortment of my scraps.


It's called Rubik's Star, and it's a really fun, versatile block. Take a look at a few layout ideas for it, just to give you an idea of the fun you can have with it...


Want to win a copy of 100 Blocks, Vol. 9 for yourself? Enter the Rafflecopter giveaway below by telling me what you do with your selvages - I'm gearing up to work on a big selvage project and I'm curious if I'm in the minority, hoarding every last one! Good luck, and I'll announce a winner on Monday, May 5th. Make sure to check out Quiltmaker's blog for even more fun giveaways :) Have a great weekend!
a Rafflecopter giveaway
Thursday, May 1, 2014

Lucky Star for May - The Vivid Star

How is it May 1st already??? April positively flew by, as have most of the months this year. Can you believe this is the fifth Lucky Stars block for the year already? Wowza! Say hello to the Vivid Star...


If you're a Lucky Stars subscriber, this month's pattern should already be in your Inbox. If you're not, you can still join in the paper piecing fun by subscribing for this year right here. If you'd like to join for both this year as well as last year's patterns, click here.

And because I adore this star so much, take a look at what it could look like in a quilt of its own...


Have a fantastic Thursday!

Welcome! I'm Elizabeth, mom to a mood teen boy and a chatty six-year-old girl and I sew for my sanity. Let's get to quilting, shall we?
The Epic Sampler BOM Club kicks off Oct 1st
Copyright 2010 by Elizabeth Dackson. Powered by Blogger.

Search This Blog

Archive

Tutorials

 photo Icicle-Star_zps7f032133.gif  photo Boxed-In2_zps800ae9da.gif EasyPeasyFauxZigZag StringHeartBlock StarCrossed CrossMAze CathedralStar RainbowRing DoubleFlip PatchworkWheel FriendshipOctogon FlyingGeese HST Weathervane MarinersStar StackedScrappyBlock ScrappyAngles HolidayPresentBlock DivideandConquer CharlestonFarmhouse ModernHalves ModCircuitry ModNine Kaleido SlicedCoins Kaleido BellaCrossing SweetGirlie MiniBookshelf ClamshellLoop DoubleHourglass BaptistFan TetrisMug StringDiamond ScraptasticTote OffsetDiamonds MunchkinSoftBook PatchworkBathMat