Wednesday, August 28, 2013

Color My World PDF Pattern Now Available!

I know as quilters that we're all partial to our quilts, and we love them (most of the time, except when they're driving us crazy) unconditionally, but I have to tell you - this really is one of my personal favorites. I love bright colors, and this quilt not only uses great fun bright colors, but I love this block. Say hello to my newest PDF quilt pattern, Color My World!

Color My World - front

Originally featured in Quiltmaker late last year, this quilt was sewn up in Vanessa Christensen's first fabric collection for Moda, Simply Color. I still have a lot of these prints in my stash, because they are such great stash staples! I just love tonal prints like these, they go with everything. The PDF pattern is nine pages long, chock full of tips to help you plan out and sew up your quilt. There's even a coloring page to give you the opportunity to plan out your colors and fabrics before sewing a stitch!

Color My World - detail 2

This quilt is a block-based quilt, with a block that is centered around a classic snowball block. Using some simple squares placed methodically, a connection is created throughout the blocks. An additional connection is made by the way I staggered the blocks by color - and I just love the hexagons that are created where the blocks meet!

Color My World - detail

I had some great pattern testers run through this pattern and create some beautiful quilt tops of their own. Kelie, Jill and Tsoniki, thank you all so much! I really appreciate your help, and I love the quilt tops you guys made :)

Kelie's Color My World
Kelie's lap size Color My World quilt top

Jill's Color My World
Jill's baby size Color My World quilt top

Tsoniki's Color My World
Tsoniki's baby size Color My World quilt top 

Through the long holiday weekend (which is perfect for putting together a new quilt top, by the way!), you can pick up this pattern on sale for $6. The pattern sale will end next Tuesday, September 3rd. You can purchase this pattern through my Pattern Shop or Craftsy, whichever you prefer. As always, I'd love to see your creations with this pattern in my Flickr group, Stitching with Don't Call Me Betsy. Have a great day everyone!

New pattern available today! Color My World
Friday, August 23, 2013

My sewing space: some questions and answers

I got several really great questions earlier this week when I shared about my new sewing space - so here come some answers on this Friday morning!

Q: What's the underside of the table look like?
A: Like this (see below)...the machine sits on a piece of wood that's about three inches (give or take) lower than the table top, and the front and right and left sides of the machine are enclosed. The back side of the machine is open, to feed the cords in and to provide ventilation to the machine. Initially, all we started with was a birch table top from Ikea, but the handyman who built the table bought several additional pieces of wood from the lumber store to build the legs, the frame, and the surface the machine sits on.

The underside of my sewing table

Q: Just wondering about your sewing chair - do you like it and where did you find it?
A: My sewing chair is from Ikea and I put it together with my own two hands, which I'm fond of. It's called Vilgot, and it was really quite simple to put together, which was a pleasant surprise! I used to have a chair with arms, and I hated it, so I really wanted something armless. This chair definitely fits the bill.

My chair - an Ikea Vilgot

Q: Isn't your bobbin side-loading? How do you change your bobbin?
A: It is self-loading. The notch in the side makes it easier to grab, but if I have a tough time, there's enough wiggle room that I can lift the machine slightly to grab the bobbin door. Once the bobbin cover is open, it's smooth sailing - there's plenty of room for me to get my hand in there to change out the bobbin and to clean it out as well.

Opening the bobbin compartment

Q: How do you like your Juki for free motion quilting?
A: Love it! It definitely took some adjusting to get it just right for FMQ, which is typical for any machine, but now that I've tweaked it, it works beautifully for free-motioning. I haven't gotten to free-motion yet with my new table setup, but I hope to soon!

How is it Friday already? This week has absolutely sped past. I hope you have a great day and a fun weekend!
Wednesday, August 21, 2013

I'm holding an actual copy of book in my hands!!!

Someone get the smelling salts, will you? It's been an epic week full of happy tears at my house - with the munchkin's first day of kindergarten on Monday, and then with a super big arrival in my mailbox yesterday. Hot off the presses, I opened up an advance copy of my book yesterday!!! Seriously, talk about happy mail!

IMG_6791

I'm not even sure how to describe what it feels to hold a real copy of my book in my hands. It feels more real than it did when it just a huge Word doc on my computer, that's for sure. I feel...elated...proud...tickled...amazed...my emotions absolutely are all over the place. I cannot wait to share more about the book right here, very soon. Here's what I can tell you so far - this book has something for everyone, from a new quilter to an experienced quilter. I hope that my love for quilting comes across in both the text and the quilts that I made for the book. I can't wait to show them all after all this time! Most of the quilts were made back in the spring of 2012, so I'm just bursting to share them!

IMG_6781rt

Want to pick up a copy for yourself? Or your best friend? Or your entire quilt guild?? ;) My book is scheduled to begin shipping on September 10th, so I've only got this one copy for the moment. You can preorder a copy from my Pattern Shop as well as Amazon, and you'll find the book in many quilt shops next month. I know I can't wait! Have a great day today :)
IMG_6787
Monday, August 19, 2013

My new sewing space revealed!

After the big move last month, my sewing space was relegated to the last spot on my To Do list as I found homes for towels and coffee mugs and the like. We did a lot of purging with the move, so I had less stuff to unpack and put away, but it still took me a long time to start tackling my sewing space. I'm super excited to say that I officially finished getting it all set up over the weekend, and spent some time photographing the whole thing, because goodness knows it will probably never again be this tidy and organized!!

Love the natural light and the view!

Let's start with the sewing table, shall we? Quite possibly my favorite piece in the room, I finally have a drop-in table. Back it up to last year when I replaced some of my sewing furniture with some Ikea pieces, my husband planned to cut into my solid birch table top and do a DIY sewing table. Never happened. We talked of it, pretty regularly, but it never actually happened. When we moved, I was pretty firm about it, that it was time for it to happen, and after spending a day or two figuring out how to do it, he decided to hire someone to do it for him. I am so thankful he did! I love my new table, which uses my old Ikea birch table top with a whole bunch of extra wood.

My new sewing supercenter in the center of my studio

The cut out is totally custom, meticulously traced by my dear husband from the foot print of my sewing machine. The machine sits on a supported wood frame under the desk, with a front facing piece to keep it pretty that has a hole in just the right spot for my knee lift. We made sure to add some extra wiggle room right where the cords come up for the machine, so none f the cords get bent out of shape. I painted the table legs white, and I might paint the rest of the wood at some point as well, just not right this moment. 

Smooth sewing ahead!

I've kept the drawer bases that I used to use to hold up my sewing machine table - I need the storage! I put one under my new sewing table and the other under my cutting table. I've got my sewing necessities in the one under my sewing machine table, like my needles and thread and sewing machine feet. And because the sewing table is taller than it used to be, I've got room to house my laptop on top.

Thread, thread, and more thread!

My cutting table now backs up to my sewing table, and their heights match perfectly, so it's like I have one big table in the center of my space, which I really like. It's the same table I've been using for cutting for quite a while.

Cutting storage cup from Target

It's my dad's old desk. I have a lot of memories of my dad working at this desk, so it means a lot to me that I'm able to use it in my space. I have it sitting on 2 x 4's to raise it to an ergonomic height for cutting, which isn't the most attractive thing in the world, but it works. I've added some 3M Command hooks to the sides of the desk as well as the wall near my cutting table for my cutting rulers, which is working out really nicely so far.

Command hooks for easy ruler hanging

I replaced my old Target bookshelves with Ikea Billy bookshelves, with doors, and I really love the finished look. I love how tall they are, and how much more I can fit in them as a result. I've got my fabric all unpacked and situated, in color order of course, with the half-yards and larger on the comic book backing boards, and the precuts and yardage that needs to be put away on the lower shelves on the second bookcase. The third bookcase houses some samples from my classes, important mementos, and supplies.

My new Billy bookcases

My scraps and fat quarters now live together in larger bins that I stack up along the wall where my design wall is. I'm mostly using fat quarters these days the way that I use scraps, so this works well for me. I've got so many darned blue scraps and fat quarters that I had to separate my light and blue scraps and fat quarters into two separate bins.

Scrap and Fat Quarter Storage

While I desperately need to clean off all the random threads from my design wall, I'm just happy it's up and staying that way at the moment. Our first mounting solution, 3M Command hooks, didn't work out and the darned thing randomly fell down a week or so ago. Now, there's a more permanent solution, with plastic hangers that are nailed to the ceiling, and it's holding steady so far.
Design wall paired with my handy dandy bulletin board and a few favorite minis - top one made by Lee/Freshly Pieced, bottom one by me

I love all the light in my new sewing space, and I'm excited to start making a big fat mess in it this week, with school starting today! I cannot believe that my little boy is heading off to kindergarten today. I better pack some tissues in my purse right now before I forget, as I suspect there's no way I'll leave the school with dry eyes. Have a great Monday!
Monday, August 12, 2013

Sew Positive quilt pattern, now available!

I'm excited to share the first of three new pattern releases that I've got coming over the next month or so, as the summer winds down and fall creeps up on us. Hello Sew Positive!

patternshop---sewpositive

This quilt was originally featured in the spring 2013 issue of Quilts from Quiltmaker's 100 Blocks, in Alison Glass's fabulous Lucky Penny bike path prints. It was a fun quilt to work on, but I knew I wanted to make another, both to run through the pattern again and to show a completely different color story.

Sew Positive - lap

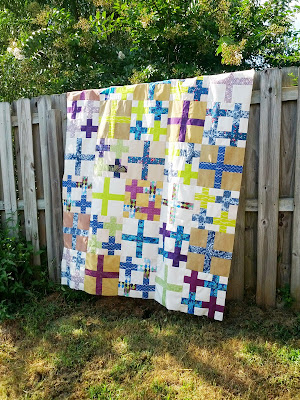
I went with much softer fabrics for this baby size Sew Positive quilt, with a boatload of Free Spirit fabrics from Tula Pink and Joel Dewberry. The background fabric is a great tweed-y textured fabric from Jenn Ski's Mod Century line for Moda. I first fell in love with this fabric at Stash Bash when I spied Marla working on her Happy Pills quilt, and I"m so glad I hunted it down! I like how much softer this version of the quilt is - and I would wager to guess that this pattern would be stunning in low-volume prints as well.

Sew Positive - baby

I also had some great pattern testers work through the pattern, and make gorgeous interpretations of the quilt. They were not only full of great feedback, but great quilts of their own!

Erica from Kitchen Table Quilting used gorgeous Kaffe Fassett shot cottons for the pluses on her mini-sized version, which I just love.

sew positive wall hanging

Kelsey from Everyday Fray has inspired me to try hand quilting again! I love the hand quilting she did around the large pluses, and the tonal fabrics she used in the small plus blocks.

Sew Positive Baby Quilt

Marla from Sew Hungry was really creative with her fabric selection. The lime surprise pluses here and there totally make the quilt, don't they?! I also really like how Marla varied the background she used, I think that gives the quilt more depth.

Marla's Sew Positive

The Sew Positive quilt pattern includes thorough step-by-step instructions and fabric requirements for making a mini, baby, lap, queen, and king size quilt. There's also lots of notes and tips on planning your quilt. Truly, Sew Positive is a simple quilt to make but it can make such a powerful visual impact with the right fabrics!

Sew Positive - Mini


You can pick up Sew Positive, in PDF format, this week on sale for just $6. Next week, it will go up to the regular price of $8. You'll find Sew Positive both in my Pattern Shop as well as on Craftsy. Don't forget to share your finished quilt in my Flickr group, I love seeing all of the different interpretations of my patterns! Have a great Monday :)
Friday, August 9, 2013

Easy peasy new quilt pattern and a new look!

Good morning, and happy Friday to you! If you're reading this morning over in Bloglovin' or Feedly or something like that, please take a moment and pop on over to the real blog - I've just finished going through a major blog makeover, thanks to the help of super blog designer Noor Alquanti. I highly recommend her if you're looking to spruce up your blog. I'm really happy with everything she put together, and I think the blog practically sparkles now, with all the beautiful white space, not to mention the great new logo. I'd love to hear what you think of the new look!

new logo for the blog! come check it out!

I've also got an easy peasy new free quilt pattern to share with you today, using some old stash favorites as well as some great prints from Modern Yardage. I fell in love with a fun deconstructed chevron that Heather Dutton designed for them, and found a few other prints of hers that I enjoyed, then pulled some stash basics to round out my selection. Then I pondered what to make. And pondered some more. And then I moved, and well, everything went to pot, so to speak!

The fabrics

I wanted to make something easy, but something that would be enjoyable to sew, and most importantly, pretty. And I'd been doodling an easier, less triangle focused, way to make a zig-zag look in a quilt, so I thought why not? So, I did. And here we are...

Easy Peasy Faux Zig Zag Free Quilt Pattern

Introducing....the Easy Peasy Faux Zig Zag quilt pattern! A free pattern download, available right here on Craftsy. The pattern includes four quilt sizes: mini (like mine), baby, throw, and queen size, with all of the information you've come to expect from my patterns. And this is seriously an easy quilt to put together - you can easily put one of these together in a day or even a weekend, if you're working on the queen size.

Easy Peasy Faux Zig Zag in Waterfront Park
queen size Easy Peasy Zig Zag in Waterfront Park

Stay tuned next week for my next pattern release, Sew Positive! I'm really excited to show you what my pattern testers have sewn up and to finally put this pattern up for sale. Have a wonderful weekend :)
Thursday, August 1, 2013

August Lucky Stars Block of the Month: Pinwheel Star

Happy August to you! Being the first of the month, all Lucky Stars Block of the Month subscribers should have a new block email in their inbox. If you did not receive it, please feel free to email me so we can find it! And as always, if you aren't already a Lucky Stars subscriber, you can join at any time, and you'll still receive all of the club blocks, even those from months past.

August Lucky Stars Block of the Month: Pinwheel Star


This month's block is the Pinwheel Star, and I really love the depth it has. I think part of the depth comes from the piecing, but the other part comes from the warm/cool contrast of the fabrics in the center star and then the frame that surrounds the star. I used one of my all-time favorite fabrics for the background, Violet Craft's Memoir print from Madrona Road, which makes me love this block even more.

All nine Lucky Stars so far all together

I cannot believe it's August already! School is starting in just a few weeks here in my neck of the woods, and while it may continue to feel like summer for the next several months here in Florida, it's clear that summer is evaporating. School supplies are flying off the shelves at Target and the like, and at at my house, we've got a countdown going to the first day of kindergarten at our house. While the kiddo's been to preschool for the last two years, this first day of school sure does feel like a bigger deal than the others have been. I suspect there may tears, but on my part, not his! Do you have any great first-day-of-school traditions in your house?

Gearing up for kindergarten

Welcome! I'm Elizabeth, mom to a mood teen boy and a chatty six-year-old girl and I sew for my sanity. Let's get to quilting, shall we?
The Epic Sampler BOM Club kicks off Oct 1st
Copyright 2010 by Elizabeth Dackson. Powered by Blogger.

Search This Blog

Archive

Tutorials

 photo Icicle-Star_zps7f032133.gif  photo Boxed-In2_zps800ae9da.gif EasyPeasyFauxZigZag StringHeartBlock StarCrossed CrossMAze CathedralStar RainbowRing DoubleFlip PatchworkWheel FriendshipOctogon FlyingGeese HST Weathervane MarinersStar StackedScrappyBlock ScrappyAngles HolidayPresentBlock DivideandConquer CharlestonFarmhouse ModernHalves ModCircuitry ModNine Kaleido SlicedCoins Kaleido BellaCrossing SweetGirlie MiniBookshelf ClamshellLoop DoubleHourglass BaptistFan TetrisMug StringDiamond ScraptasticTote OffsetDiamonds MunchkinSoftBook PatchworkBathMat