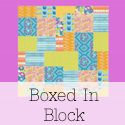
For one 12.5" block, you'll need:
Various scraps as small as 1.5" square
2 - 1" x 8.25" strips of white (or another neutral solid)
4 - 1" x 8" strip of a contrasting neutral (I used Kona Coal)
2 - 3" x 12.5" strips of white
2 - 3.5" x 8" strips of white
For each block, lay out your scraps (and cut them down as necessary) in three sets of approximately 10.5" long strips.
2. Sew your strips together, chain-piece style, and make sure to press well.
3. Once you've pieced your patchwork rows together and ironed them, lay them on your cutting mat and trim them down to 8 1/4" wide. Don't worry about whether or not the seams match perfectly across the top of your strips, we're going to fix that in a moment.
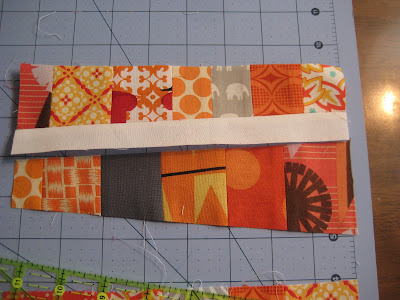
4. For your top row, do trim the top to make sure it's good and straight, all the way across. Then, make a nice, wonky cut across the bottom of the strip. Try to keep the strip at least 1.5" long at the shortest. Then, add a skinny strip of white (or another neutral of your choice) to the bottom of the strip, where you made your wonky cut. Press well.
5. For your next cut, you'll be making two wonky cuts - one on the top and one on the bottom. Try to match the angle of the wonky cut at the bottom of your first strip for the top of this second strip.
Then, get creative with the second wonky cut. Attach a skinny strip of your white sashing to the bottom of the strip. Press well. Then, attach both sashed strips to one another and press well.
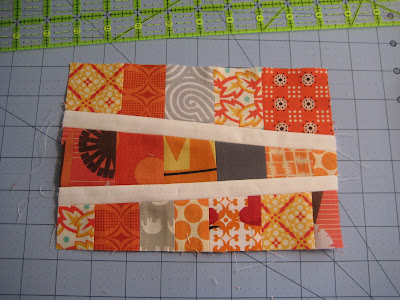
6. Lay your finished strips on top of your remaining strip of patchwork. Again, try to match the angle for this wonky cut. Don't worry about the bottom of the strip for now - we'll straighten it out in a moment. Attach this newly wonky strip to the white sashing at the bottom of your joined patchwork. Press well.
9. Add your strips of contrasting sashing all the way around your block.
10. Trim as necessary before adding your white (or neutral) sashing - your 3.5" strips should go on the top and bottom and the 3" strips should go on the left and right sides of the block. Add your white sashing all the way around, and press well.
11. Trim your block down to a finished 12.5" size.
I'm off to the post office today to send these blocks in the mail to the girls in my beehive. If you make a block (or two, or even a whole quilt!), make sure to let me know - I'd love to see it!
I'm sharing today at {Sew} Modern Mondays at Canoe Ridge Creations and also at the awesome block party hosted by QuiltStory's Heather and Megan. I'm entering this group of blocks in the Modern category.










Dude! Went to add this tute to the Block Library - and it was already there! Great block! LOVE it!
ReplyDeleteOh cool! This is getting bookmarked, thanks! They look fantastic.
ReplyDeleteThanks for posting a tutorial! So many possibilities with choosing a colorway...adding this to my list of must-dos!
ReplyDeleteGreat block! Thanks for the tutorial! I will definitely try this with some scraps.
ReplyDeleteMichelle
Oh this block is great! Thanks for sharing the tutorial, it will definitely go on my to make list!
ReplyDeleteYea! This is really cute! Wouldn't it be cool to use a little strip of selvedge for one of the skinny sashing strips?
ReplyDeletevery cool! many thanks for the how-to!
ReplyDeleteI love it. What a great way to use up scraps.
ReplyDeleteThose are seriously awesome blocks! I love them!
ReplyDeleteWhat an AWESOME block and tutorial! I cannot wait to try this. Great Job.
ReplyDeletevery cool. I have a whole basket full of tiny scrap pieces that would work great with this block. you are very inspiring.
ReplyDeletethank for the tute.
What a great idea. Way to use up those scraps!
ReplyDeleteI LOVE these blocks!!
ReplyDeleteGreat idea to use up those scraps in those wonderful colors!
ReplyDeleteOh, wow! I love these blocks! I just stumbled on your blog today and really dig your quilts -- I think we have similar tastes in patterns and fabrics!
ReplyDeleteGreat block...thanks for the tute! I love the 3x6 Bee!
ReplyDeleteOhhhhh, I so totally love these blocks! I kew there was a reason I was saving all these scraps!
ReplyDeleteThis is so awesome! Love it! Seriously, you amaze me everyday! :) Thanks for linking up to {Sew} Modern Monday!
ReplyDeleteLove this, thanks for the tuturial...definitely bookmarking for future use!
ReplyDeleteThanks so much for sharing how you made these, I'd love to make these blocks one day! :) Thanks so much for submitting for the block party, we really had so much fun so THANK YOU!
ReplyDeleteThank you for sharing this block, you do such beautiful work.
ReplyDeleteThanks for the tutorial. These are wonderful blocks. I can already picture the quilt they would make with my stash of scraps.
ReplyDeletewhat a great block! I'm definitely going to have to try this one out! :)
ReplyDeleteI really like the blocks!!
ReplyDeleteI love this block! I hope you don't mind if I borrow a picture :) Promoting a Wonky Bee ;) www.quiltmonstercloset.com
ReplyDeleteShowing people Ideas for it..
I attached your blog as a link :)
This technique is so neat n useful, I save all my scraps. I can't wait to get started on making one.
ReplyDeleteThanks so much.
CeCelia
I love your tutorials, they are easy to follow, thank you
ReplyDelete