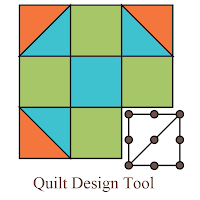

Have you checked out Threadbias? It's a great online sewing community website designed for and run by sewists like you and me. You can share and plan projects, connect with others, exchange ideas, and now, you can even use Threadbias to design your own blocks and quilts. Threadbias just launched its new Quilt Design Tool at QuiltCon, and I've spent the last week or so working with it and putting together a fun block tutorial for you.
The Threadbias Quilt Design Tool allows you to not only build blocks, but lay out full quilts, using actual fabric swatches. As a web-based tool, it's also always fully up-to-date, to avoid any glitches or software trouble. I have several computers in my house, and in trying the Quilt Design Tool on all of them, it seemed that it ran the best using the Google Chrome browser. It's also fully PC and Mac friendly, since it's web-based!
One of the nice features of the Threadbias Quilt Design Tool is that you can try before you buy. There is a "lite" version that's available to everyone with a Threadbias account, which is absolutely free. You can try all of the features of the Quilt Design Tool out, with a 9" x 9" workspace. You cannot save your design in "lite" mode, but you can get a feel for how the tool works before you purchase your monthly subscription to the tool. Subscriptions are only $10 a month, and can be cancelled at any time - even after cancellation, you'll still be able to view the designs you've created during your subscription, you just won't be able to alter them.
If you'd like to see more of what you can create with the Quilt Design Tool, you can watch this demo video Threadbias shared at QuiltCon or check out the series of video tutorials, created by Alex from Threadbias.
And because this is a blog hop about a quilt design tool, I've created a new block tutorial for you guys! This block was super easy to put together in the Quilt Design Tool, using some simple shapes and filling them with fun fabrics in my stash.
Are you ready for the block tutorial? I'm calling this block the Cross Maze, and I definitely see myself making a full quilt with this block soon. I hope you enjoy it! And as always, if you use this tutorial, I'd love to see your work in my Stitching with Don't Call Me Betsy Flickr group, or my new Threadbias group by the same name!
Are you ready for the block tutorial? I'm calling this block the Cross Maze, and I definitely see myself making a full quilt with this block soon. I hope you enjoy it! And as always, if you use this tutorial, I'd love to see your work in my Stitching with Don't Call Me Betsy Flickr group, or my new Threadbias group by the same name!
Cross Maze Block Tutorial
All seams are a scant ¼” unless otherwise noted
CUTTING:
white text print:
white text print:
(2) 1 ½” x 18 ½”
(2) 1 ½” x 16 ½”
(4) 1 ½” x 2 ½”
(4) 1 ½” x 3 ½”
(2) 1 ½” x 4 ½”
(4) 1 ½” x 5 ½”
(4) 1 ½” x 6 ½”
(4) 1 ½” x 6 ½”
dark blue:
(4) 2 ½”
teal:
(4) 2 ½” x 5 ½”
(4) 2 ½” x 4 ½”
(4) 2 ½” x 3 ½”
fuchsia:
(1) 4 ½” x 12 ½”
(2) 3 ½” x 4 ½”
ASSEMBLY:
This block is put together in three simple units: A, B, and C.
Unit A
1. Align the raw edges, right sides together, of one teal 2 ½” x 3 ½” rectangle and one 1 ½” x 3 ½” white rectangle. Join and press seams open.
3. Align the bottom raw edges of one 2 ½” x 5 ½” teal rectangle, right sides together, with the top raw edge of the patchwork unit you just created. Sew together, and press seams open.
4. Align one 1 ½” x 5 ½” white rectangle with the right side of the patchwork, right sides together, and sew together. Press seams open.
5. Finally, sew one 1 ½” x 6 ½” white rectangle to the bottom of this patchwork unit and press well. Repeat to create a total of four A units.
Unit B
1. Join a teal 2 ½” x 4 ½” rectangle, right sides together, with a white 1 ½” x 4 ½” rectangle. Press seams open.
2. Next, align a pink 3 ½” x 4 ½” rectangle with the remaining long raw edge of the white rectangle and join. Press seams open and repeat to make a total of two B units.
Unit C
1. Take the center piece of your block, the 4 ½” x 12 ½” pink piece, and sew
one 2 ½” x 4 ½” teal to both short ends of the rectangle
. Press seams open.
PUTTING THE BLOCK TOGETHER:
2. Join each A unit to a B unit, then join an additional A unit on the to the opposite side of the B unit. Press seams open as you go. Repeat for the other side of the block.
3. Join an A/B/A unit to the right side of Unit C, and press seams open. Repeat on with the remaining A/B/A unit and press seams open.
4. Finally, join the shorter set of white borders to the top and bottom of the block, followed by the longer white borders on the sides. Press seams open and ta da! A finished block!
4. Finally, join the shorter set of white borders to the top and bottom of the block, followed by the longer white borders on the sides. Press seams open and ta da! A finished block!
Monday, March 25 - Freshly Pieced
Tuesday, March 26 - Don't Call Me Betsy
Wednesday, March 27 - Generation Q Magazine
Thursday, March 28 - The Sometimes Crafter
Friday, March 29 - Diary of a Quilter
Monday, April 1 - Swim, Bike, Quilt
Tuesday, April 2 - Fresh LemonsWednesday, March 27 - Generation Q Magazine
Thursday, March 28 - The Sometimes Crafter
Friday, March 29 - Diary of a Quilter
Monday, April 1 - Swim, Bike, Quilt
Wednesday, April 3 - West Coast Crafty
Thursday, April 4 - Sew, Mama, Sew!
Friday, April 5 - Alison Glass
Saturday, April 6 - Pink Castle Fabrics
Sunday, April 7 - Ellison Lane Quilts


I love the cross maze block. Adding it to my to-do list.
ReplyDeleteAmandaK@whatthebobbin
I was playing around with it yesterday some and once I get used to it I think it will be really useful:)
ReplyDeleteThanks for sharing your block - I always love your designs!
ReplyDeleteThank you for sharing your block I am excited to go play with the lite version!
ReplyDeleteLove your block! I love Threadbias!
ReplyDeleteThis tool looks so cool!
ReplyDeleteI've never used a quilt design tool/software because I'm not very tech savvy and figured I wouldn't be able to manipulate it. You make it look so easy. Thanks for the block tutorial. I'm saving it to a special place so I can try making it! ~karen
ReplyDeleteSuch a great resource & I LOVE your block! :)
ReplyDeleteI would love to try this! I have a Mac so it's nice to have a design tool available for mac
ReplyDeleteI really like that this tool is web based and is Mac friendly. Thanks for your cute block tutorial.
ReplyDeleteI really like that this tool is web based and is Mac friendly. Thanks for your cute block tutorial.
ReplyDeleteHi Elizabeth! That looks great too and your block is beautiful! I have joined Threadbias and it's great place to share and meet other quilters! x Teje
ReplyDeletenerospost(at(gmail(dot)com
This design tool seems so smart! I love that it is web-based. I can't wait to try it out someday.
ReplyDeleteI met them at QuiltCon and watched the video the other day. I really like this!!
ReplyDeleteLove Threadbias and LOVE the design tool. I have been using it for awhile now and prior to this had never used anything to design quilts except graph paper. It is so easy and fun to use and the tutorial videos really help! And this is a great online community so come on over. And great block:-)
ReplyDeleteOoh I didn't know they had a lite version - neat! Will try that out for sure.
ReplyDeleteSo I'm all signed up for Threadbias!!! LOVE it! :) Thanks for the chance to win!
ReplyDeleteFantastic! Thanks so much for the review. Have to try it.
ReplyDeleteI'd love to try it out.
ReplyDeleteI would love to win a free month! So excited about this design tool! Thanks for the chance! Love the block you designed!
ReplyDeletemrs(dot)hbraun(at)gmail(dot)com
Neat block. I'm definitely going to try out this tool. Thanks!
ReplyDeleteI would love to get this so I can get my ideas into actual quilts. I can't translate from paper to fabric very well. :)
ReplyDeleteThanks Threadbias and Elizabeth
looks like a fun tool!
ReplyDeleteI'm with Amy above....I've been dreaming about creating my own designs now I have the tool to make it a reality.
ReplyDeleteThank you Elizabeth and Threadbias
I have a Threadbias account but I would love to try this design tool!
ReplyDeleteThanks for great review and tutorial. I'm definitely going to try out the lite version this weekend
ReplyDeleteI signed up for Threadbias and I will check out the design tool this weekend. It looks like a handy tool to have...
ReplyDeleteLooks like a very cool tool, I will definitely have to try it out!
ReplyDeleteThanks for the giveaway!
ReplyDeleteHow fun! I'd love to be able to try this out!
ReplyDeleteI've been trying out the free version, seems pretty cool! I love the block you designed!
ReplyDeleteLove the Cross Maze block ~ thanks for the giveaway.
ReplyDeleteWhat a great design... thanks
ReplyDeleteI actually have a quilt design in mind and was just sitting around last night dreading all of the math I'd have to do! This would be great!
ReplyDeleteVery cool! I would love to win. Thanks!
ReplyDeleteI signed up and tried it out. It is very neat in the trial version. Can't wait to try the full version sometime soon.
ReplyDeleteThanks for the Threadbias recommendation. Just signed up and it looks awesome! Excited to start playing around with it.
ReplyDeleteSo cool! This tool looks awesome!
ReplyDeleteI'm enjoying giving this a go - much easier to use than Microsoft Office shapes, haha!
ReplyDeleteOoooh! I'm so glad I read on!!! I love the tut! AND I have a threadbias account, so I love the giveaway, too!!! YEAH me! I hope I win! Thanks!!!
ReplyDeletethe quilt tool looks like fun!
ReplyDeleteI am interested in designing my first block with all my new Fabrics, I will follow along, I have had a TB acct since Day one.
ReplyDeleteLove your block and I really appreciate hearing about the Threadbias design tool! Can't wait to try it!
ReplyDeleteLove your block! I've been wanting EQ7 but it's so expensive. So to have the option of going month by month if need be sounds really good.
ReplyDeleteThanks for the chancr
ReplyDeleteThis is so timely for me... I need this now!
ReplyDeleteThanks for the chance to win. Looks so fun.
ReplyDeleteShawn
Great tutorial and can't wait to try this tool!!
ReplyDeleteI would love to wins a trial!!
ReplyDelete