Thursday, June 23, 2011
Kaleidoscope QAL: Start your rotary cutters!
Are you ready to get started? Chomping at the bit a little? ;) I am still so floored by the how many people are interested in this little quilt-along, and I'm so excited to start seeing more progress photos in our Flickr group! Cutting is going to be pretty simple for this quilt, but once you do your cutting, I'm going to encourage you to do some playing around with your fabrics to help plan out how you're going to start your piecing next week.
Templates
Let's start with printing this handy dandy template. You can download it here.
There are two pieces to this template, both of which include a quarter-inch seam allowance - Template A, the Kaleidoscope parallelogram that I will call a Kaleidoscope triangle because it turns into a triangle when pieced into the quilt, and Template B, the corner triangles. Print out this template, and you can do one of a couple of different things with it to start using it. First, though, make sure that your template is printed correctly and to size. Template A should be exactly 6.5" tall. If Google Docs gives you trouble, try downloading the PDF, then open it in Adobe Acrobat and print it there, while making sure the page scaling is set to "none" - thanks, Kati for that great tip. If you still have troubles with this, let me know and I'll send you the PDF directly.
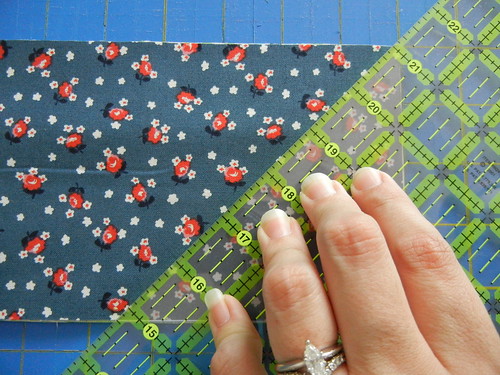
Now, to make your templates, you can purchase template plastic at your local craft store to make your templates from, you can use cardboard from a box, or you can stick with just paper. You can also use freezer paper, like Jo, or you could use tupperware lids/bottoms or milk jugs, like Alysowl! Also, I find that I am most successful cutting accurately with plastic templates, combining them with a ruler, so I don't accidentally cut the template itself. Another great template tip, from Leila, is to actually tape the side of the template to your ruler, to keep it from scooting around on you!
Cutting
Now that you've made your templates, it's time to cut! Here's what you want to end up with:
Kaleidoscope triangles:
* Baby quilt - 48 prints, 48 solids
* Big quilt - 120 prints, 120 solids
Corner triangles
* Baby quilt - 48 prints, 0 solids
* Big quilt - 120 prints, 0 solids
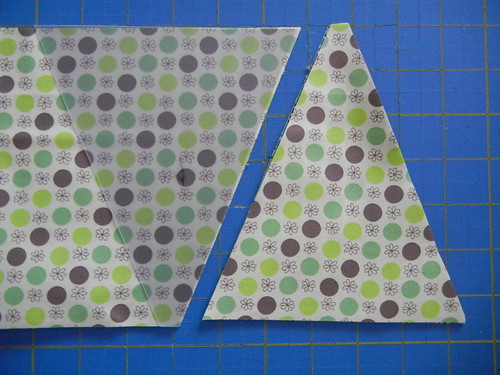
To cut your kaleidoscope triangles, you'll cut 6.5" wide strips of fabric. If you're cutting from half-yards or quarter-yards, you should be able to cut 10 kaleidoscope triangles from each 6.5" x WOF strip. If you're cutting from fat quarters, you should be able to get a total of 5 kaleidoscope triangles. When you cut one entire kaleidoscope triangle, flip the template over as shown above and cut again, to avoid waste.
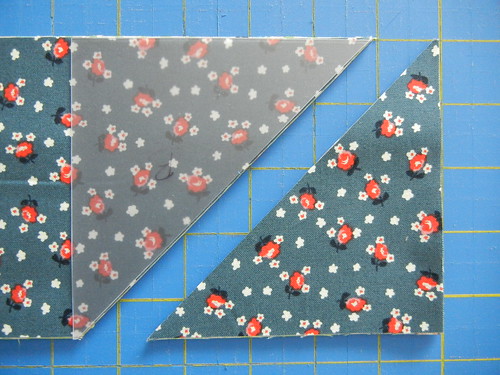
To cut your corner triangles, you'll cut 4.5" wide strips of fabric. Then, line up your template with the raw edge of the fabric, and cut around your template. You can then flip the template over, just like you did with the kaleidoscope triangle template, and cut again. If you're cutting from half-yards or quarter-yards, you should be able to cut at least 18 corner triangles from each 4.5" x WOF strip of fabric. If you're cutting from fat quarters, you should be able to get a total of 9 corner triangles from each cut you make.
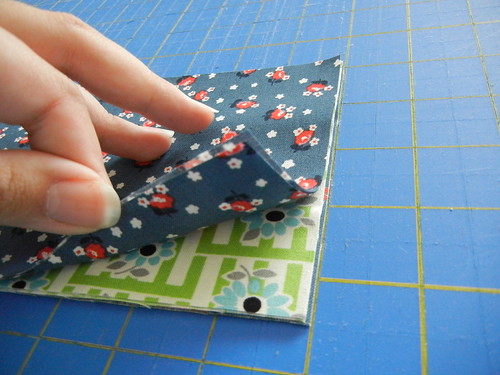
Also, a handy cutting tip - you can definitely stack a few fabrics on top of one another to minimize the amount of cutting you have to do. Just make sure to cut slowly and cautiously for accuracy!
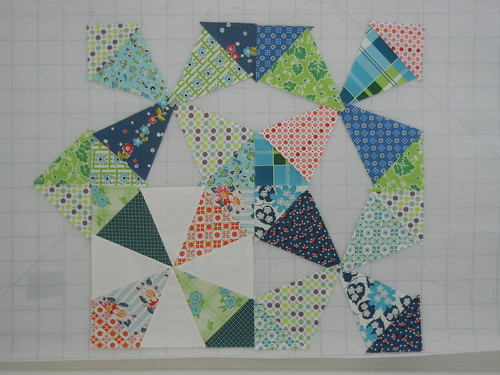
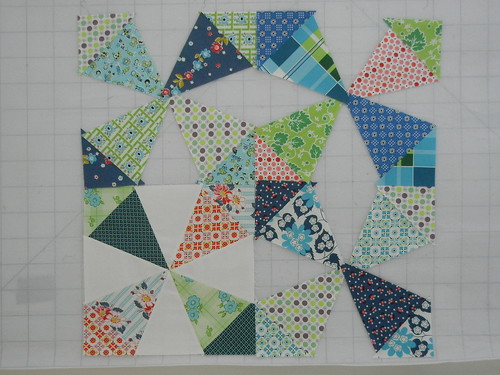
Once you've finished cutting, it's time to play. You can use a design wall, you can use your floor, you can use whatever space works for you, but you're going to want to play around with how you want this quilt to work out. Here's a few ideas...
You can go monochromatic with your corner triangles, creating a monochromatic diamond...
You could go totally scrappy (which is what I'm leaning towards, despite how much I like geometric patterns)...
There are really tons of different ways to lay these prints out, so feel free to start thinking about this after you finish your cutting! Better yet, pop over to the Flickr group to see some of the diagrams people are making while they think about how they're going to lay out their Kaleidoscope quilts.
Stay tuned next week for the start of your piecing instructions, and if you have any questions, don't hesitate to drop me a quick line or to pop over to the Flickr group and ask!
Now, go get cutting!! :)







Yippee! Thanks E for fab, clear instructions. How exciting! Jxo
ReplyDeleteHave been checking your blog all morning (UK time) as I have to print instructions today at work to start this weekend. When the update came I literally shouted 'whoo hoo!' (luckily I'm in an office on my own!). Anyone think I'm a bit over excited?! Thank you so much, I can't wait to get cracking.
ReplyDeletexx
Okay, I already have a question! I have had real issues in the past printing templates and want to check I have it right. You say template A (pattern #1 on the print out?) should be 6.5in tall. Is that top to bottom across the middle of the triangle or point to point along the long size?
ReplyDeleteIf it's point to point things are good, if it's top to bottom I have a problem with my print out!
Thank you! (sorry for being a pain but I have made some horrible mistakes in the past with bad print outs and ended up weeping...)
xx
I feel as if I've been waiting forEVER and a day and am excited to be able to start cutting! Unfortunately, that won't be until tomorrow since I have to work today... drat work!
ReplyDelete:)
If we are using FQs should we be cutting both shapes out of the same FQ or one FQ is one shape, another is the other shape, etc.?
ReplyDeleteJudith, good question! Yes, in the center, from the tippy top to the bottom should be exactly 6.5 inches. If the template gives you trouble, shoot me an email at naptimemartha(at)gmail(dot)com!
ReplyDeleteAnd Tiffany, yes, you'll be cutting both shapes out of each fabric - if you want, that is. If you plan to use your FQ's in a different kind of way, with only some of them as corner triangles and some just as the bigger Kaleidoscope triangles, that's fine too, it's up to you - as long as you end up with the correct amount of each for your quilt size. As for what I did, I had 16 different fabrics, and cut both shapes from each fabric. Good luck!
ReplyDeleteThe instructions are very clear and easy to follow! Great work and I can't wait to get started on mine :o)
ReplyDeleteMy templates didn't print at the right size, either. My pattern 1 is only 6" tall and pattern 2 is only 4". It looks like the angle at the top of the kaleidoscope triangle is correct, so all I would need to do is extend the sides to add 1/2" on the bottom.
ReplyDeleteThanks for such clear instructions, I am keen to get started on this quilt.
ReplyDeleteWhen I was cutting out wedges, I would tape the templates to the bottom of the ruler. It was sooooo easy.
ReplyDeletehttp://sewnbyleila.blogspot.com/2011/03/lilys-quilt-along-cutting-wedges-all.html
This is going to be a great quilt!
Great instructions. I did have to try a couple times to get it to print correctly. I couldn't get it to print right from Google Docs. I downloaded it onto my computer, opened it in Adobe and then printed from there (making sure page scaling was set to "none). It worked great. Thanks for putting this together!
ReplyDeleteyay! i can't wait to get started, although i've got so much going on for the next few days that it will have to wait a week. i like you fabric choices!
ReplyDeleteI have these 2 dies!! I'm going to follow along:o) Amie
ReplyDeleteYessss! Very exciting. My templates look good too. I did the same thing as Kati. I used the little button to e-mail it to myself, and then I opened it in Adobe to print.
ReplyDeleteVery excited to start cutting! But have to wait til the weekend :) need to work :( to buy more fabric :)
ReplyDeletejust dont tell my husband hehehe
Have a nice weekend
and Thank you for the great instructions
Marta
Can't wait to get started! Thank you so much for the wonderful instructions. I was having the same problem with printing, but I enlarged to 105% and it is now a perfect 6 1/2 from top to bottom.
ReplyDeleteOh, I'm so excited! Can't wait to get started but I'm away on hols till next Thurs - I'm going to be more than a week behind, eeeeek!! Oh well, I'll get stuck in when I get home :-)
ReplyDeleteHey, that's a good idea: tape the template to the ruler! I've taped it to the fabric, which has held it in place with the ruler on top of it, but taping it to the ruler may be more accurate!
ReplyDeleteWoohoo! Let the games begin... Yay!
Yea!!! Here I go...
ReplyDeleteCould you email the pdf to me? Thanks! (I can never get google docs to work right, but the adobe pdfs are fine.) can't wait to get started this naptime!
ReplyDeleteCould you email the pdf to me? Thanks! (I can never get google docs to work right, but the adobe pdfs are fine.) can't wait to get started this naptime!
ReplyDeleteWoo hoo! Can't wait to get started!
ReplyDeleteI am SO glad we have a week for this. My background fabric hasn't arrived yet... And I'm not sure if it will or it'll be back-ordered!
ReplyDeleteOH YAY!!! If I try to do monochromatic corners, they will probably end up scrappy, so I might just give in LOL! Thanks!! :D
ReplyDeleteThanks so much for these clear and easy instructions! Can't wait to start, have to wait till after he weekend though...
ReplyDeleteThanks for organizing this QAL!
Yay! Looking forward to it!
ReplyDeleteWith PAGE SCALING set to NONE, the triangle came out an exact 6"... yea!
ReplyDeleteThanks for the tip about taping the template to your ruler... that has GOT to make things much easier!!!
Okay.... I printed out two... the first was 6", the second with NONE (on the PAGE SCALING) was 6.5"...
ReplyDeleteWork... it's been a l-o-n-g day and I have 3.5 hrs to go....
*lol*
woohoo! Can't wait to get cutting! I'm sure I can figure it out, but any tips for using the kaleidoscope ruler (mine is from Joanns and is the one you had mentioned would work)?
ReplyDeleteHow exciting! Thanks for a great instructions for the cutting. I will have to get started ironing my fabrics later today :)
ReplyDeleteEkk it is already time for cutting. :) OK I can do this :)
ReplyDeleteCan't wait to start cutting! Yippee!!
ReplyDeleteI printed my templates on a piece of manila file folder. Its thin enough to go through the printer, but thick enough to use as the template. I had to cut it down just a little to fit in the printer feeder. Hopefully it will work out well for the template when I actually start cutting the fabric!
ReplyDeleteI emailed the templates to myself then printed them, they are perfect size.
ReplyDeleteGreat instructions, Going to start cutting this weekend.
I've been really really trying to resist...
ReplyDelete*sigh*
great instructions & beautiful clear photos! I can't wait to hack into the Christmas fabrics I'll be using...maybe they'll keep me thinking cool thoughts despite the summer heat! i'll post to flickr and my blog once i make some headway on the layout. yay!
ReplyDelete(www.seamkeel.com)
Thanks for the instructions and templates - looks very clear! Not sure if I will be able to start cutting this week but hopefully very soon...
ReplyDeleteI'm excited with the way my fabrics look already. Can't wait for next week!
ReplyDeleteoh just see the wonderful block. please can I have the pdf? I am a handsewer, I like it to work with my sraps. will also wait for the next step
ReplyDeletemug elfriede
Sorry to ask a dumb question, but what would you guess the finished demensions of the baby quilt and big quilt would be? I mean, how *big* IS a "big quilt"? I'm excited to get started on this one!
ReplyDeleteI am so excited to get started with this! I just made my template this evening, but when I came to cut out, it didn't line up. I cut 6.5" strips and was then going to cut out the angled sides of the big template, but after I had cut the first side, the second side didn't line up. I don't know whether my printer is printing out wonky, so I am thinking of trying a practice block before I cut all my fabric. Has anyone else had this problem?
ReplyDeleteHi Ali, sounds like either your printer did something funky or maybe your rotary cutter needs a new blade? Let me know it goes - your Blogger profile doesn't have an email address associated with it, so I can't respond to you via email, just here on the blog. :)
ReplyDeleteOh k sorry if this is such a simple question (my brain seems to stop working on Saturday) do we just need 48 triangles total from all the prints for the baby size, or 48 from each. I am pretty sure it is 48 total but I just want to make sure! Thanks!
ReplyDeleteHi Elisabeth! I love your Kaleidoscope work and would love to join but no time now... you have chosen so beautiful colours!
ReplyDeleteHappy sewing! xxx Teje
hooray!! i'm sooo excited about this! My fabric is cut and ready to go!
ReplyDeleteOK, just got on board the QA train this morning. Thank you for stressing the template size (6.5"). My printer defaulted to a "shrink to fit page" originally. Can't wait to get started. Love QA's b/c I actually finish something I started!
ReplyDeletewoo hoo!! Just got all my fabric cut! Can't wait to start piecing!!!
ReplyDeleteThank you for the great tutorial. I am having trouble downloading the template could you please email me it. Thank you.
ReplyDelete