Tuesday, June 19, 2012

Mail call!

My mailbox has been a super happy place lately, with several wonderful goodies putting a big smile on my face.

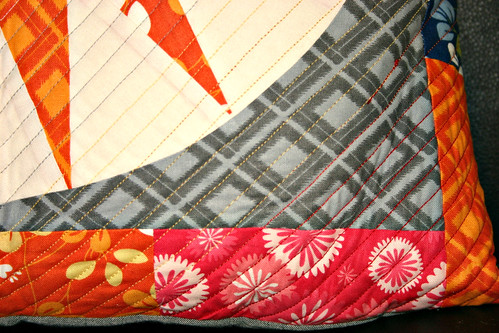
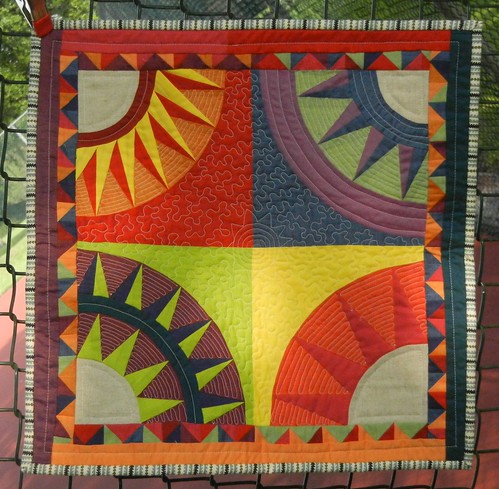
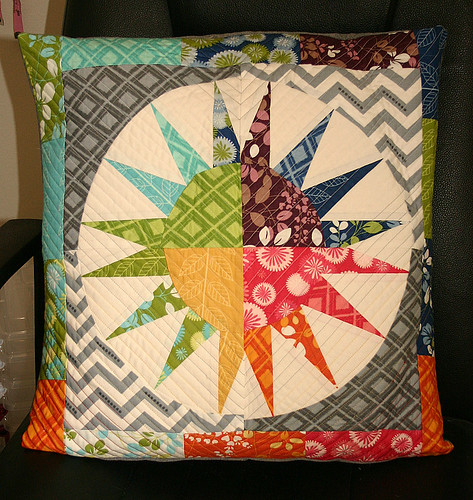
The first wonderful thing that came to me was a super fabulous pillow from John of Quilt Dad. Amy put together a fun small NY Beauty swap a while back and I'm so glad she asked me to participate. I got to send my NY Beauty mini to Lee, and John sent me this gorgeous pillow! I feel so lucky! This pillow is just perfect for my sewing room, and nice and colorful, just the way I like it. Even the stitching is multicolored! This pillow totally made my day :)

IMG_9430rt

IMG_9435rt

I also have gotten hooked on English Paper Piecing...at least the idea of it :) After finally tackling hexagons for my Zakka project last week, EPP doesn't seem anywhere near as daunting as I used to think it would be, and I ordered some new pieces to try out last week, after drooling over a wip that Terri has been working on for the Pillow Talk Swap. I love the idea of digging into my scrap bins and making something out of them for once, so I'm hoping that I will show some follow-through here and give these little guys a try soon!

IMG_9438rt

I finally caved and ordered a Michael Miller Cotton Couture card from Caitlin at I Don't Do Dishes, and boy I'm glad I did. I really love the crazy soft hand of the MM solids, and now the next time I order them, I will know exactly what color I'm getting. And the card is super cute to boot!

IMG_9440rt

And finally, did you see that the voting has opened up for Jennifer's Summer Sewing Contest? There are so many gorgeous projects featured there, and one of them just happens to be mine - my NY Beauty mini is the last entry in the Home Decor category, in case you want to vote for me - or your other favorite summer projects! Have a great day!

NY Beauty mini
Sunday, June 17, 2012

Winners!

Drumroll please!  I owe you guys some winners!!

The winner of the EZ Dresden ruler from Simplicity is:

#5: Johanna

And the five winners of a sample pack of Aurifil threads are:

#23: Linda of I Finally Have Time
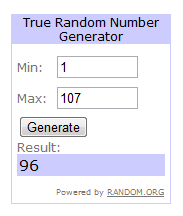
 #96: Marit of Sew Live Love
 #27: Miss Planner
 #62: Karrie of I Know This Much Is True
and #11: Debbie of A Quilter's Table!

Congratulations to all of you! I will be emailing each of you today to get your address information. Thanks to everyone who entered, and thanks for all of the wonderful things that you had to say as well!

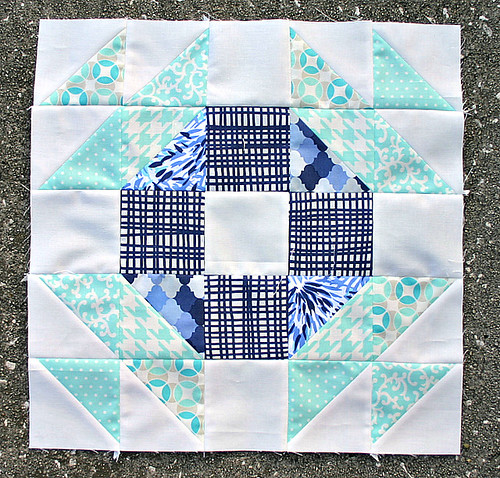
And because I can't leave you without a picture, here's a bee block I finished up yesterday for Tiffany in the Stash Trad bee. The block is called a Crown of Thorns and here's a link to a tutorial for it.

Block for Tiffany
Saturday, June 16, 2012

Bella Parade: Chevron Laptop Sleeve Tutorial

Do you have a laptop that needs to travel? I do, I've got big plans to get a lot of things done on my laptop in the comfort of a cozy chair at Starbucks this summer whilst my munchkin has fun at his half-day summer camp. And I don't want to just cart around my laptop all naked and exposed to the elements! I needed a laptop sleeve, but I wanted a pretty one, so I put together this simple, patchwork laptop sleeve, a short project that took me an afternoon.

IMG_9423


Chevron Laptop Sleeve Tutorial

You'll need:
Exterior fabric
Flap fabric
Lining fabric
For patchwork on exterior front:
- long scrap for patchwork frame
- various scraps for chevrons, 2 1/2" x 10"
1 package of velcro, or 10" if you find it by-the-yard
1 yd fusible fleece

1. Every laptop is a different size, so you will need to tweak this pattern to fit your laptop appropriately.  First, let's do the pattern math.  Begin by measuring your laptop and noting the dimensions shown below.
lengthwidth
EXTERIOR/LINING
To figure the size of the exterior and lining pieces, follow this simple formula: L + H + 1" x W + H + 1". We're adding that one inch on all sides of the bag to allow for seam allowances, but I can assure you that you will get a nice, snug fit. For my laptop, which is 15" (width) x 10" (length) x 1"(height), that meant that my exterior pieces were 17" x 12".

FLAP
Use the same dimensions you determined previously for the exterior for the lining.  The flap will be 5.5" long, but for the width, use the W + H + 1" measurement. The flap will attach to along the width of the bag.

2. Make exterior front.  To create your 6 chevrons, you will cut 2 sky pieces and one geese piece from each fabric you're using, for a total of 6 geese and 12 sky pieces.

Geese: 3" x 5 1/2"
Sky: 3" squares (2 per flying geese unit)

NOTE: My exterior front finished at 17" x 12". If your laptop is a different size than mine, you can alter the patchwork frame by making it smaller or larger to best the dimensions you created in Step 1.


Be sure to trace a diagonal line on the wrong side of each sky square once you've cut them.  Next, lay out your chevrons so you can plan the order.

chevronlayout

To piece the geese, line up a sky piece with a geese, aligning the raw edges, and sew along the diagonal line you drew.  Trim the excess sky on the back side and press the seam open. Repeat on the opposite side of the geese unit, making sure that the sky units cross in the top center of the geese unit.

IMG_9336

Repeat to make a total of six flying geese units. Seam all six units together in order to create the chevron pattern, using a scant 1/4" seam.


seamingchevrons

Next, from your patchwork frame fabric, cut two pieces 1" x 4 1/2" and two pieces 1 1/2" x 17". Again, you may need to adjust these numbers so that your patchwork will finish at the correct width for your laptop, based on the dimensions you determined in step one.  Seam the short pieces on each end of your patchwork strip, then the longer pieces to the top. Press seams open.

patchworkframe

From your main exterior fabric, cut two pieces to add to the top and bottom of the patchwork frame, the top piece measuring 3 1/2" x 17" and the bottom piece measuring 2 " x 17". Seam the top and bottom pieces to the chevron patchwork and press seams open.

Let's add the Velcro to the exterior front piece. To find the appropriate placement first fold your exterior front piece in half to find the center. Place a light crease, above the patchwork, where you'll be placing the Velcro. Next, using a ruler, measure 1" up from your finished patchwork frame. Using a water soluble fabric marking pen or other marking device, draw a small dot or X on the crease.

IMG_9375

Next, fold the fuzzy Velcro piece in half to find its' center and line it up the bottom center of the Velcro with the mark you've just made. Stitch in place, using a tight zigzag stitch all the way around.

IMG_9383

3. Cut fusible fleece to match the dimensions of your exterior front and back pieces. Adhere fleece to the wrong side of your exterior front and back pieces, using a hot dry iron. Set your finished exterior pieces aside for the moment.

4. Let's make the flap piece now. First, we need to add the corresponding Velcro to the flap. Using the flap panel lining piece, fold it in half just as you did with the exterior front to find the center. Crease lightly.  Make a mark or X 1" from the top of the flap piece, and center the top of your sticky Velcro with this mark. Stitch in place, again using a tight zigzag stitch.

IMG_9376

To finish the flap piece, pin the two flap pieces together, right sides together, aligning raw edges. Do not pin the top opening, which is opposite where you've placed the Velcro.

IMG_9378

Using a 1/4" seam, seam around the three sides you've pinned and backstitching at the start and stop. Turn the flap right sides out and press well. Topstitch around the sides of the flap, taking care to skip the open side of the flap.

IMG_9380

IMG_9381

Center the flap along the top of the exterior back piece and baste in place, using just an 1/8" seam and a long stitch length.

5. To finish the exterior, align the edges of exterior front and back pieces, right sides together, with the Velcro at the top of the front, and the basted flap also at the top. Pin around the other three sides, skipping the top for now, and seam around the three sides, using a 1/2" seam, backstitching at the start and stop. Press seams open and flip right side out.

IMG_9386

6. Repeat step 5 for the lining with a few exceptions - leave a gap of about 5" at the bottom of the lining and double pin the start/stop of the gap to remind you when you're stitching. This is the hole that we'll pull the exterior through to finish the sleeve. Use a slightly larger seam allowance, like a 5/8" seam allowance, to insure that the lining is slightly smaller than the exterior for a snug fit. Press seams open, but do not turn the lining right side out.

IMG_9387

7. Place the exterior, right side out, inside the wrong side out lining - this will put the right sides together, trust me! Pin around the top opening, taking care to match the seams on the sides. For this step, I highly recommend using a walking foot as it will help insure that the thick layers of fabric will move through the foot at the same speed.  Stitch all the way around the top using a 1/2" seam allowance.

IMG_9399

8. Time to pull reach in the hole you left in the interior to pull the exterior through!  Pull gently. Be sure to push the corners of the lining and exterior out nicely. Press.

IMG_9401

9. Stitch the opening in the lining closed - you can do this by hand or by machine, it's totally up to you. Remember, it will be on the inside of the sleeve, so no one will ever see it but you!

IMG_9403

10. Tuck the lining inside the sleeve and topstitch around the top of the sleeve, to keep everything in place nicely. Place your laptop inside and enjoy!!


IMG_9423


opensleeve

I hope you enjoyed this tutorial, and if you have any questions as you make your own chevron laptop sleeve, don't hesitate to let me know! I always love to see what you make, please feel free to add your creations to my Flickr group.
Friday, June 15, 2012

Bella Parade: Hello purple!

Welcome to my stash post as a part of the Bella Parade, a celebration of the new colors making their debut this year for Moda's Bella solids line.  I was given four of the new solids and asked to shop my stash for some fun pairings for these solids.

IMG_9330
from left to right:
Bella Wisteria, Bella Mauve, Bella Petal Pink, and Bella Sand

I love working with solids, but I realized as I attempted pairing these solids with prints that I usually work in the opposite direction - finding solids that match prints that I want to work with!  It took several auditions for my to find my final four prints to work with this solids stack.

Now, admittedly, I'm not normally much of a purple person. It's a hard color to shop for in fabric, as the options are typically quite limited, but I was able to find four really great prints in the purple section of my stash that played really nicely with all four shades in my stack.

IMG_9324
prints from left to right: Tula Pink Parisville Eye Drops Dot in Dusk, Anna Maria Horner Loulouthi Framed in Shadow, Pat Bravo Modernology Fashionable in Azure, and Anna Maria Horner Loulouthi Clippings in Passion

IMG_9326

There are lots of other great coordinates for these four Bella colors, and here's a few to make your wallet sweat...

Birds&Bees


Freshcut


Poetica

Thanks for joining me today to hear about these four new colors - to learn more about the other new colors Moda has introduced, be sure to visit Shruti and Emily to read the other wonderful Bella Parade posts.  I hope you'll join me tomorrow to make a fun, easy project using some pieced chevrons! 

IMG_9331
Wednesday, June 13, 2012

WiP Wednesday: The one with the new and improved sewing space

Ah, the first Wednesday of the summer. I'm having a hard time finding my summer groove so far, and haven't spent a whole lot of time sewing, but I have been going through this odd little belated spring cleaning spree. The biggest accomplishment I've made this last week is a big reorganization of my sewing space. I can now proudly say that I know exactly what fabrics I have and more importantly, where they all are!! I'm so glad that I spent some time doing this, it was totally worthwhile.

BEFORE
IMG_8294
lots of leaning towers of fabric!

AFTER
DSCN9545
no more piles!

DSCN9546
nice drawers for all of my fat quarters, unsorted scraps, and selvages

DSCN9548
sorted scraps on top of the bookcases

DSCN9552
precuts right where I can see them!

I did wrap up two big projects late last week, my EZ Dresden Challenge quilt, Dresden Stairs, and my Zakka Sew Along project, the Orchard Path pouch. Giveaways are open through the end of the week on each of those blog posts, too, so if you haven't entered yet, hop on over!

IMG_9180rt IMG_9359

In other sewing news, I've got a bunch of catching up to do now that I've got a nice, clean space again.  Here's what I've got going on:

In the works: 

Bee blocks for Kati - Kati is working on a really cool star sampler and since I'm in two bees with her, I'll be making two different star blocks for her. I think I may draft one myself and do a Florida star for the other. I really love the color scheme Kati's using for this quilt!

DSCN9567

Bee block for Tiffany - Tiffany's asked for a Crown of Thorns block, and I had fun pulling some blue scraps together for this block. I got started with some half-square triangles for this block and I'm hoping to wrap this up to get this block in the mail next week.

a2b7beacb4c011e188131231381b5c25_7


Christmas in July project - I'm super excited about the Christmas in July festivities that are coming up next month. I'm still debating on what I'm going to do, but I am having fun finding some non-holiday fabrics that still give me that good old holiday feeling!

DSCN9568

Bella Parade project - I've got a new tutorial to share with you all on Saturday, using four new Bella solids and some fun print coordinates that have been in my stash for a while. Still need to put the finishing touches on it, but it's almost ready.

3ad3d888b19c11e19dc71231380fe523_7


Stalled at the moment:

Patchwork Wheel quilt
New munchkin quilt
Farmer's Wife quilt

What are you working on this week? Write it up and share it over at Lee's WiP Wednesday linky!
Monday, June 11, 2012

Orchard Path Pouch - Zakka Sew Along Week 11

Welcome to Week 11 of the Zakka Style Sew Along! I was really excited to work on the Orchard Path Tweed Pouch for the Zakka Along, in part because it included something I've been really wanting to try (EPP hexagons!!) and you can never have too many pouches :)

Zakka Style Sew Along

Unfortunately for me, in my first attempts at the pouch, I misunderstood the enlargement instructions, perhaps due to a lack of an appropriate level of caffeine.  Just in case you fall into that same boat when you make your pouch, be sure to only enlarge the pouch pattern piece - not the corners or the hexagon, those don't need enlarging.  Because if you enlarge the hexagons, they finish up around the same size as the whole pouch.  Trust me.  Want to know how I know?

IMG_9166

LOL, I made used these "wrong" pouches as teacher gifts last week for the munchkin's two teachers, and fortunately, this is an easy-to-follow pattern that whips up really quickly, so I didn't mind having to make a third pouch.

DSCN9561

For my third pouch, I pulled a few fun scraps for a pouch for me, using Robert Kaufman Quilter's Linen in Azure as my main pouch fabric. The pattern calls for tweed, but the only source I could find locally for tweed (Jo-Ann's) didn't have any tweed that I felt compelled to work with, so I went with (faux) linen instead. I love the look of Quilter's Linen, and I especially enjoy that it behaves like cotton when you work with it, rather than linen, which can sometimes stretch in odd ways. I did use some actual linen for the pouch corner accents, Robert Kaufman's Essex Linen in Chartreuse. For my lining, I pulled my current favorite Spoonflower find, from none other than Rashida Coleman-Hale herself - an outtake print from Washi that you can only find on Spoonflower. Isn't it adorable?

IMG_9372

The directions for the pouch are really quite straight-forward, with the exception perhaps of the zipper instructions. If you are new to zippers or less than confident in using them, I highly recommend you follow the Kelbysews style of zipper pouch making - adding tabs to the zipper after shortening it to 1.5" shorter than the pouch itself, so in this instance, trim your zipper to 8.5", lopping off the excess on the end rather than the pull side of the zipper.

IMG_9360

Don't forget to post a photo of your finished pouch in the Flickr pool and link it up at Lindsey's blog, LR Stitched, for a chance to win an amazing prize, some beautiful fat quarters courtesy of Art Gallery Fabrics!

AGGallery


Would you like to adorn your pouch with some special stitching? You can enter to win a 6-pack of gorgeous Aurifil threads, and I have five packs to give away! I adore working with Aurifil, I've started using it exclusively in the last few months and I cannot possibly recommend it enough. This giveaway will close on Friday, June 15th at 11:59pm EST and I will announce winners on Saturday.

DSCN9560

Welcome! I'm Elizabeth, mom to a mood teen boy and a chatty six-year-old girl and I sew for my sanity. Let's get to quilting, shall we?
The Epic Sampler BOM Club kicks off Oct 1st
Copyright 2010 by Elizabeth Dackson. Powered by Blogger.

Search This Blog

Archive

Tutorials

 photo Icicle-Star_zps7f032133.gif  photo Boxed-In2_zps800ae9da.gif EasyPeasyFauxZigZag StringHeartBlock StarCrossed CrossMAze CathedralStar RainbowRing DoubleFlip PatchworkWheel FriendshipOctogon FlyingGeese HST Weathervane MarinersStar StackedScrappyBlock ScrappyAngles HolidayPresentBlock DivideandConquer CharlestonFarmhouse ModernHalves ModCircuitry ModNine Kaleido SlicedCoins Kaleido BellaCrossing SweetGirlie MiniBookshelf ClamshellLoop DoubleHourglass BaptistFan TetrisMug StringDiamond ScraptasticTote OffsetDiamonds MunchkinSoftBook PatchworkBathMat