You'll need:
Circle Cut ruler , or similar
Water-soluble fabric marker
FMQ foot of your choice - I use a spring-loaded open toe foot
FMQ thread of choice - I use Gutermann or Aurifil, but whatever your machine likes will work just fine
A few notes about this tutorial:
* I am right handed, but I stitch right to left in this tutorial and 99.9999% of the time. Why? Because it makes sense with the way my machine is set up. Feel free to flip the ruler upside down and trace your fans in the opposite direction so you can stitch right to left, if you prefer quilting that way.
* This design can also be done with a walking foot, but honestly, I really intensely dislike straight line quilting (and to me, all quilting with my walking foot is like straight line quilting), so I much prefer this method. I feel it's way more enjoyable, but to each their own.
Let's FMQ!
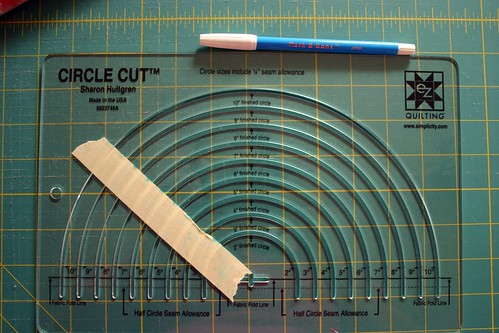
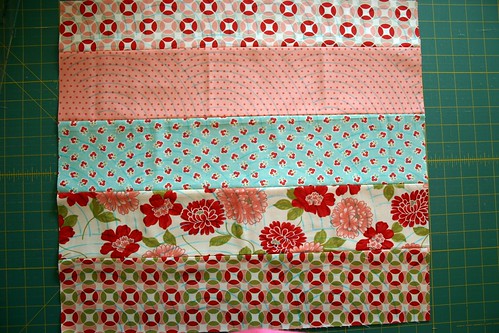
1. Before basting, take your finished and pressed quilt top to your cutting table or another large surface. It's best to do your marking on an unbasted quilt, in case the marker bleeds through to your batting. It's also a lot easier to work with, without the extra heft of the batting and backing. Note below that I have modified my circle ruler slightly; I have added a piece of masking tape at an approximately 45 degree angle, so that I don't overtrace my fans.
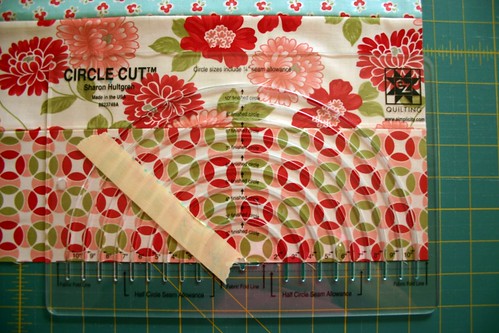
2. Align your Circle Cut ruler with the bottom of your fabric, with the outside edge of your outermost circle line close to the edge of your fabric. It doesn't have to be at the edge, just close. Begin tracing the lines, stopping at the tape.
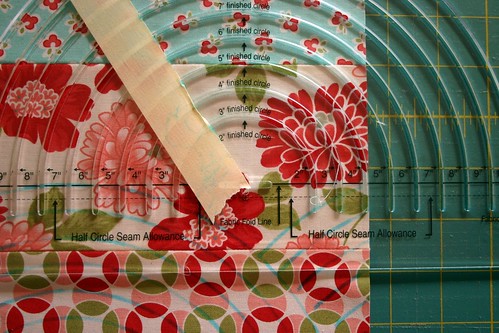
3. Repeat step 2 over and over until you have completed your first row of fans, scooting your ruler to the left and starting each new fan with the outermost arc butting up to the edges of your previous fan.
4. To start a new row of fans and create some additional visual interest, you'll want to nest your fans. To do this, set your ruler with the arrows in the center lining up with where your fans below meet as shown below.
5. Continue tracing fans and creating new rows until you have covered the quilt top.
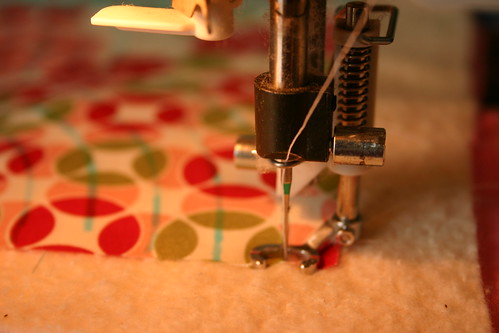
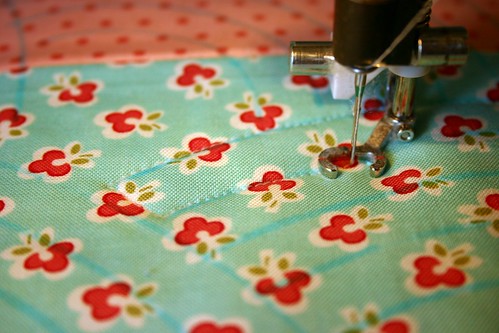
6. Baste quilt as desired. Next, load up a fresh bobbin, your FMQ foot of choice, and get ready to quilt. Begin by putting your needle down at the start of your fans in the bottom right hand corner of your quilt. If your machine has a needle down feature (where whenever you stop the machine, the needle is down), be sure to turn it on. We're going to be moving the quilt to create the curves in these fans, but in a linear fashion. There will be no rotating of the quilt as this design is quilted.
7. Stitch-trace the outermost curve of your fan, moving from right to left, until you reach the end of your first curve. Stop, with the needle down. As you're stitching your first curve, the one after that, and the zillions after that, here's a tip: Don't freak out if your needle bobbles or wobbles a little bit as you're stitch-tracing. Just keep flowing with it, don't try to correct it immediately, you can gradually work your way back to the blue line. Once you rinse the blue lines from your quilt, you'll never see the wobbles again. I promise. :)
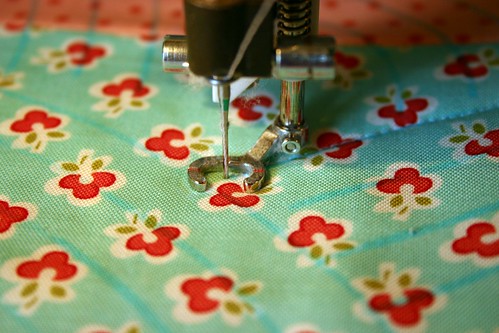
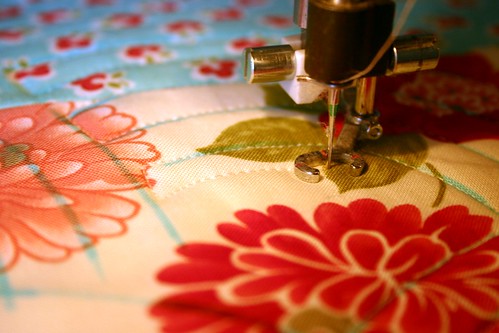
8. To begin stitching the next curve, slowly stitch downward from your top curve down to the next curve, as shown below. Then begin stitching to the right, again tracing the curve.
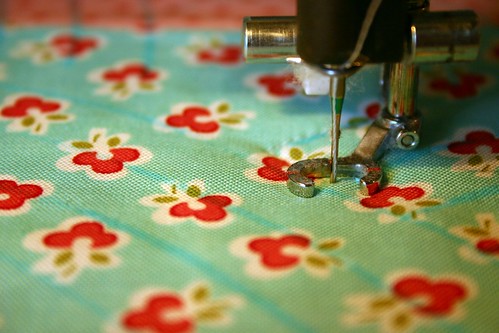
9. Continue stitching back toward where you began your fan, creating the second curve of the fan, and stop, needle down, at the end of the traced line. Next, stitch to the left, to catch the next traced line.

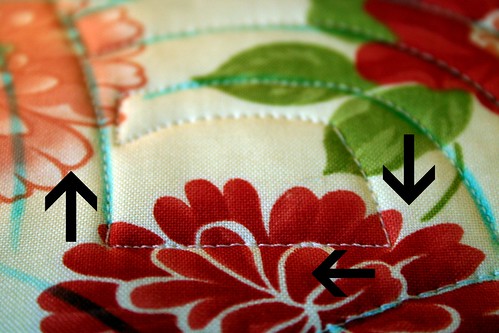
10. Repeat to stitch all traced lines from your Circle Cut ruler. You'll notice, however, that when you stitch the final traced curve, that you have stitched to the left of the stems of your fan curves. You will need to freehand stitch the final curve of your fan, moving back to the right, to match your other curves.
11. To travel to your next fan from your final freehand curve, stitch to the left, to the edge of the outermost curve of the next fan as shown below. The arrows show you here which direction to move your quilt as you stitch.
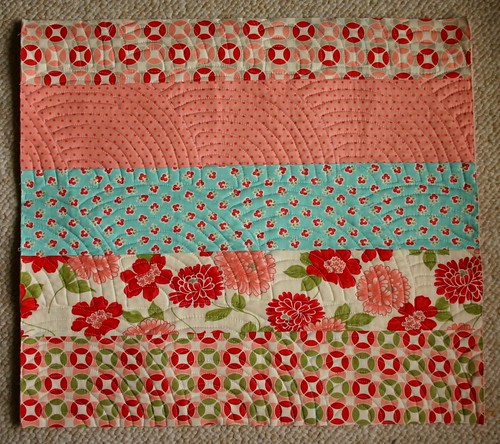
12. Repeat, stitching over each traced line, until all lines are stitched. Then, using a spray bottle loaded with water, rinse away those blue lines, and ta da!

Now, if my husband ever stops working 18 hour days, I will try to post a video of me doing this kind of FMQ, to help make it a wee bit clearer. If you have any questions, don't hesitate to let me know! And if you use my tutorial to add some fans to your quilt, please be sure to shoot me an email, I'd love to hear all about it! You can also add photos of your work following this tutorial to my Flickr group. Have a great day!


Awesome tutorial, Elizabeth! Your fans look so beautiful and you make it seem totally do-able!
ReplyDeleteYou did a great job of explaining! I really like these fans. Thanks for sharing!
ReplyDeleteLove the look of Baptist fans! Thanks for making this seem doable!
ReplyDeleteThis tutorial is FANtanstic! Seriously...thank you so much!
ReplyDeleteI was going to get in with a FAN joke but Linda beat me to it lol. This is brilliant. I am a little scared, but you made it seem completely doable. Off to buy a ruler now :-)
ReplyDeleteI'm so glad you posted this!! I wondered how you did the fans, and now it seems so easy...thanks!!
ReplyDeleteI have been trying to figure out what to quilt on my Twister quilt and now I know I want to try the fans. I bought half circle templates but if they don't work I'll pick up the circle cutter for sure. Thanks for the tut!
ReplyDeleteBarb@witsend
Thanks for sharing, what a wonderful tutorial, those fans look fantastic.
ReplyDeleteThis is so fun. I need to try it out.
ReplyDeleteGreat tutorial Elizabeth! These fans are just awesome, I am definitely adding this to my FMQ list of designs to try!
ReplyDeletethanks for the tutorial elizabeth. i love how this looks!
ReplyDeleteThis is incredible! I'll be trying this for sure. Thanks for the tute. :)
ReplyDeleteVery cool - thanks for sharing!
ReplyDeleteLast week you let me know you were going to do this tutorial. Thanks for doing it so quickly! I am going to practice today. I already have small "quilt sandwiches" made up to practice on.
ReplyDeleteYour quilts look wonderful! Thanks for the great tutorial!
ReplyDeleteThank you so much for this tutorial!! I really wanted to quilt a quilt in this pattern but have been delaying it- this is so helpful!
ReplyDeleteThis is awesome! I didn't clue in that this would have been done with a FMQ foot. Cool!
ReplyDeleteGreat tutorial, thanks! You make it sound totally doable!
ReplyDeleteThanks so much for the tutorial! LOVE the result this quilting gives! Would it be alright if I pinned an image from the tutorial so I can find it again?
ReplyDeleteWonderfull tutorial. Thanks you!!!! Greetings from Spain!!!
ReplyDeleteI am absolutely excited! I have that circle cutter and now will put it to good use! *sigh* I wish I were this clever.....
ReplyDeleteIt doesn't look TOO hard . . . I better get to practicing my FMQ so I can try it! Thanks for the tutorial!
ReplyDeleteAwesome! Can't wait to try something new!
ReplyDeleteGreat tutorial E!! I already have the ruler too. I see baptist fans in my future.
ReplyDeleteFANtastic. Snickers... Linda made me laugh with that one.
Great tutorial! Here's a funny thing: As a Mennonite, I have always called these Baptist fans. There is a new book out called Utility Quilting, and she calls them Mennonite fans. hehe
ReplyDeleteThanks for the tutorial, it doesn't look too difficult. Looking forward to trying this in the future.
ReplyDeleteNice walk though I am new to quilting and keep trying to work up the nerve to try more MFQ. I have never thought to draw out my design on the quilt that is a great idea will have to try that.
ReplyDeletehttp//richardquilts.blogspot.com
http://trackmyshows.com
Very cool, thanks for sharing :o)
ReplyDeleteWow! Just Wow....
ReplyDeleteI do wish I had seen this last week... hmm, go back in time, undo what is done... I need a time machine... but the Storytome quilt I just completed would have been perfect practice on this.
ReplyDeleteGreat tutorial, makes me want to go and stitch something. I am not even practiced enough to be a novice at machine quilting, but this tutorial is really inspiring. Thanks M
ReplyDeleteThank you for sharing how you quilted those lovely curves. I have never done that, tracing out a pattern but I should give it a try, it sure looks great!
ReplyDeleteJust found your blog through twitter. That is such a wonderful idea for quilting. I'm always try to think of something besides straight lines. I sure thank you.
ReplyDeleteThis is beautiful, thank you! ~ Lynda
ReplyDeleteEasy to follow tutorial. Thanks so much
ReplyDeleteThanks so much for this! I am encouraged to give this a try and BONUS - I already have that ruler! :)
ReplyDeletewow! Thank you for this great tutorial! It really looks like it's doable. I don't know whether I'll try it on a big quilt like you (you have my respect for that) but maybe on a little one (as I'm still getting used to FMQ). Thanks so much. It's something different then the "usual" meandering pattern.
ReplyDeletevery smart!!
ReplyDeletexo
eva
Thank you thank you Elizabeth!!
ReplyDeleteHooray! I got a circle cut ruler for Christmas, and this is another fun way I can use it. :)
ReplyDeleteGreat tutorial ..this is one idea I will definetly try!
ReplyDeleteAwesome tutorial. Makes me want to try FMQ! Almost ;)
ReplyDeleteI love the fans! Thanks for directions, I just might try them sometime.
ReplyDeleteI can't wait to try this out, but I can't quite get the sewing directions straight in my head. Any chance someone could do a quick diagram with lots of arrows showing which lines get quilted in which direction and in which order?
ReplyDeletePure genius! And I already have a Circle cut ruler! Thanks for being so clever!
ReplyDeleteSue in Marion, IN
I've been looking for some clear, concise instructions for the Baptist fan for a long time. Thank you for posting this. I know my next purchase will be the circle cut ruler.
ReplyDeleteThanks so much for this -- I have been planning to do large scale BFs on a quilt for my son, but was torn between trying to go completely freehand FMQ (intimidating) and using a walking foot (lots of stops and starts). Your approach is perfect!
ReplyDeleteThis is the design I've been looking for to use on my dragon quilt. I didn't know what I wanted to do until I saw this and had that "Aha!" moment.
ReplyDeleteSusan in CA
Late to the party as always, I just saw this...and it's great! Can't wait to try it, and I actually have the ruler but have never used it. Thanks so much for sharing!
ReplyDeleteI know it takes a big effort to publish a blog entry. Thank you! I really enjoyed this tutorial. Very well done!
ReplyDeleteAnd I was about to freehand the fan, as a first try!!! What am I thinking?
ReplyDeleteLovely tutorial which I found again on the Sew Mama Sew blog, I have it in my bookmarks but would much rather put it on my Pinterest board for Tutorials where I would find it easily! Is this possible?
ReplyDeleteSure, you're welcome to pin this page. Thanks!
Delete