You will need:
13 various scraps for your books **see cutting step #1**
Various scraps of white fabric or another neutral, background color
1" x 20" strip of gray, brown, or other bookshelf colored solid fabric
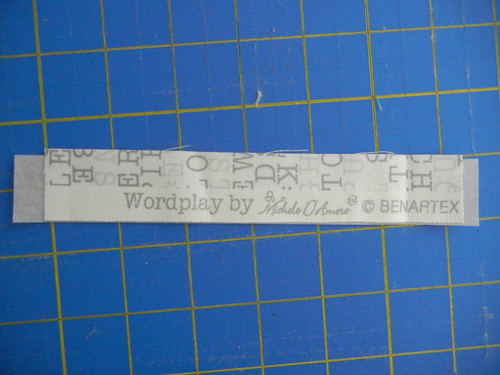
Selvages or textual fabrics for book titles
Steam-a-Seam 2
Fat quarter for the background
Binding of your choice
Cutting Instructions:
1. From your various book fabrics, use the list below to cut your books. Feel free to adjust these guidelines as necessary, to best suit the fabric you're using.
- Book #1 - 2" x 10"
- Book #2 - 1" x 12"
- Book #3 - 2" x 6.5"
- Book #4 - 1.25" x 9"
- Book #5 - 1.5" x 11"
- Book #6 - 1.5" x 9.5"
- Book #7 - 2.5" x 8.25"
- Book #8 - 1.5" x 9.5"
- Book #9 - 1" x 10"
- Book #10 - 2" x 11"
- Book #11 - 1.75" x 12"
- Book #12 - 2" x 12"
- Book #13 - Up to you! This is your leaning book, and should be at least 18" long or longer, depending on how much of a lean you're going to create for your last book.
2. From your background fabric, cut:
- 1 - 2" x 20" - This piece will sit under the "bookshelf"
- 1 - 1.5" x 15" - This piece will be used for sashing on the left side of the books
- 1 - 2" x 3" - This piece will sit on top of your leaning book
- 1 - 6" x 15" - This piece will be the right side of your leaning book
- 1 - 4" x 12" - This piece will be to the left of your leaning book
- 1 - 10" x 2" - This piece will sit at the bottom of your leaning book
- 1 - 10" x ??" - Use scraps here, if you've got them. We will use these pieces to make the negative space above the books.
3. From your binding fabric, cut 2.5" strips to yield 98" of binding. If you are cutting WOF, this is a total of two 2.5" strips.
4. From your bookshelf fabric, cut a strip, 1"x24".
Sewing Instructions:
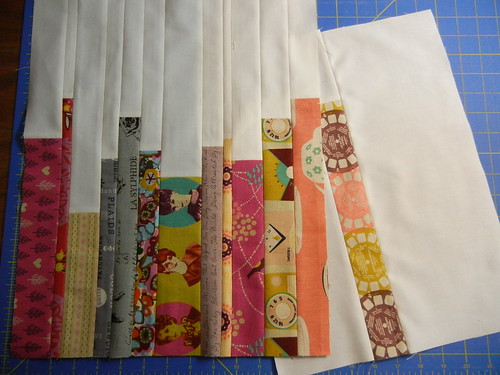
1. Lay out your various 10" long pieces of background fabric. Pin each of your book fabrics, 1/4"-1/2" apart, right sides together, raw edges aligned. It should look something like this.
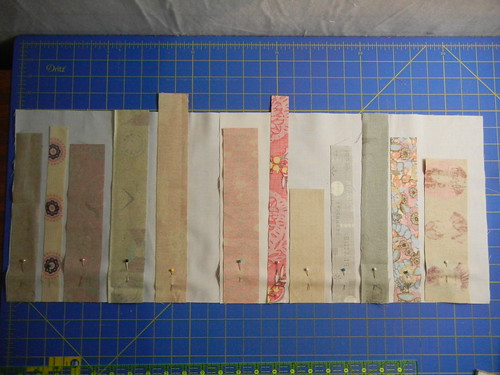
Sew a 1/4" seam down the length, and press seams open. Then trim your pieces to match the width of your book. Trim each book plus background strip to a uniform 15" tall.
2. Pair the books together and set your leaning book (#13) off to the side for now. Sew Book #1 to Book #2, right sides together, raw edges aligned, then Book #3 and Book #4, and so on until you have sewn all of the books in pairs. Press seams open.

3. Continue to seam the book pairs together, right sides together, raw edges aligned until all of your books are together in one solid piece. Press all seams open. Set aside.
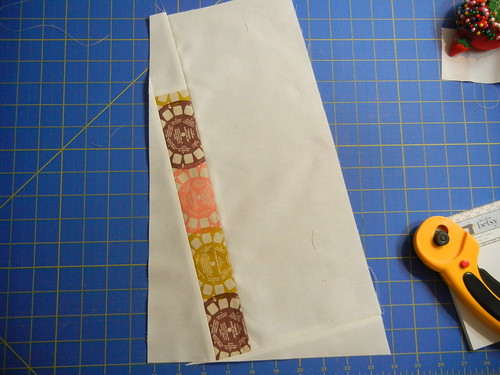
4. Add your 2" square of background fabric to the top of your leaning book (#13), right sides together, raw edges aligned. Sew using a 1/4" seam. Press seams open. Next add the 4" x12" piece to the left side of your leaning book, right sides together, raw edges aligned. Sew using a 1/4" seam, and press seams open. Do the same with the 6" x 15" piece of background, adding it to the right side of the leaning book. Finally, add the 2" x 10" sashing to the bottom of your leaning book. It should now be sashed around all four sides.
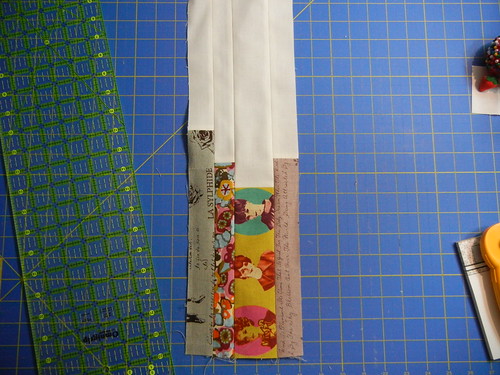
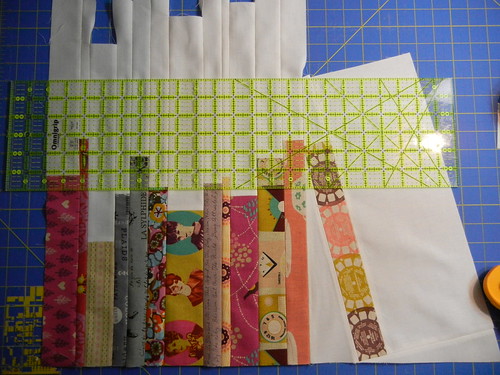
5. Next, it's time to line up your leaning book. First, lay your bookshelf so far on your cutting mat, then lay your leaning book beside it, as you see below.
Try to line up the leaning book so that the bottom left corner of the book matches the bottom of the other books. Then, measure 1/4" inch from where you've decided to place your leaning book, take a deep breath, and cut.
Seam leaning book and bookshelf together using a 1/4" seam, right sides together, raw edges aligned. Press seams open and your shelf should be starting to look complete.
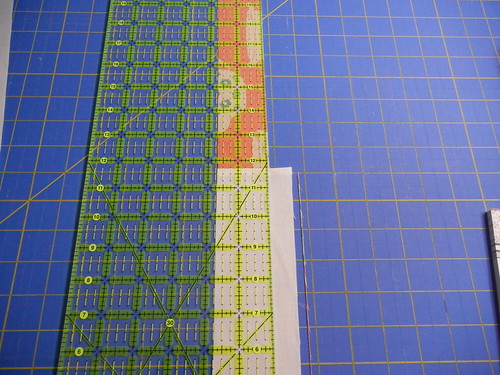
6. Trim leaning bookshelf to match the other books. For the right side of the leaning book, line your ruler up with the right edge of the bottom of the leaning book, and measure 1.5" inches to the right (even though the picture seems to indicate otherwise!). This is where you will make your cut.

Also trim the top of the books to a uniform 15" tall.
7. Add a strip of 1.5" x 15" strip of sashing to the left side of the books, matching right sides together and seaming with a 1/4" seam. Press seam open.
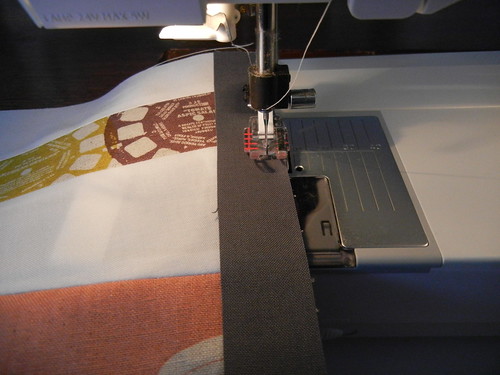
8. Take your 1" x 20" strip of bookshelf material and seam to the bottom of the books, right sides together, raw edges aligned, using a 1/4" seam. Press seam open.
9. Next, seam your 2" x 20" strip of white/background fabric and seam to the bottom of the bookshelf, right sides together, raw edges aligned, using a 1/4" seam. Press seam open. You have now completed the top of your miniquilt!
10. And now for the book titles. Take your selvages and/or textual fabrics and trim as desired - but leave approximately 1/4" excess fabric all the way around. Cut a piece of your double-sided fusible web (Steam-a-Seam or similar) to match, and peel off one side of the web. Add your fabric here.
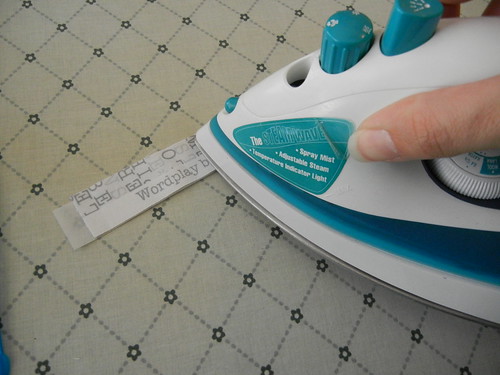
Use the tip of your hot iron to get your book title to stay put, then go back to your cutting mat and trim your web more precisely to match the fabric (which will still be slightly too big). Use your iron to press your webbing in place well, then trim your book title down as desired.
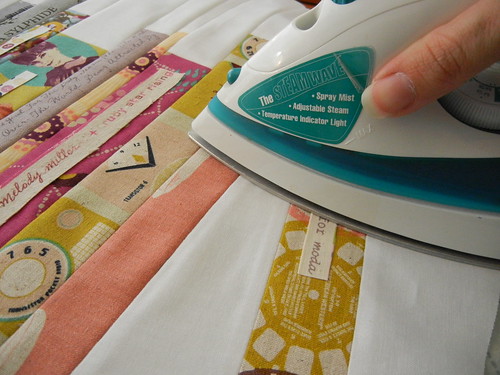
To add title to a book, peel the backing of the web off, place the title where you'd like it, and iron it on. Ta da! Make sure your iron is nice and hot for this step.
11. Baste miniquilt, batting, and backing together. I used spray baste, which is super wonderful and makes the quilting so much faster!
12. Quilt to your heart's content, as desired. I recommend sewing down the edges of the book titles you have added, for extra security and because it looks nice. It's entirely optional.

13. Bind, and enjoy!

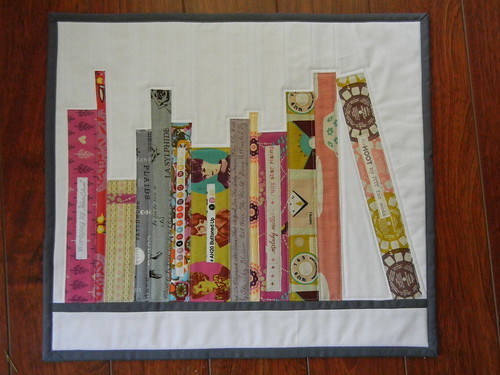
I hope you enjoyed this tutorial, I know I enjoyed making another one of these miniquilts. If you make one, I'd love to see it :)
I'm linking up today with {Sew} Modern Monday. Make sure to go see what everyone else is finishing up today, I always finds ton of inspiration over there! I'll also be linking up with QuiltStory's Fabric Tuesday, which is another place to see tons of eye candy!


That just turned out so great. I'm sure your swap partner will be thrilled.
ReplyDeleteI can't tell you how much this makes me want to stay up until 3am making one of these! :) Thanks for sharing your tutorial. I would have made myself crazy trying to piece selvedges in there... ok I might still try it but your way looks amazing (and probably much more accurate than mine would have been!) :) Great work!
ReplyDeleteThis is so great!
ReplyDeleteWhat a fun little project, thanks for putting the tutorial together!
I'll wait... but if your bookshelf arrives at my house, I'm seriously going to pee myself with excitement! :P Your tutorial looks great. If I'm not making one for myself, I definitely have a friend in mind to make one for.
ReplyDeleteI just love this!! Great tutorial too, must make one!
ReplyDeletebookmarking this one!
ReplyDeleteI love this pattern!
ReplyDeleteDefinitely going to make one!
Thanks for the tutorial! I'm definitely going to do this one...for sure!
ReplyDeleteThanks for making this tutorial, now I have a nice project for this week (or next week, let's just see how the week goes...).
ReplyDeleteThis is such a cute project. Thanks for the tutorial.
ReplyDeleteThat is an absolutely adorable quilt!! Thanks so much for taking the time to make the tutorial. Such a great job!
ReplyDeleteThank you so much now to be on the hunt for material. Have a wonderful week.
ReplyDeleteYay, this is awesome! Can't wait to try it! : )
ReplyDeleteGreat tutorial! I especially liked the selvages at titles.
ReplyDeleteThanks for the tutorial. I have been wanting to make a book shelf quilt for so long and I think this is the inspiration I needed to just sit down and do it!
ReplyDeleteGreat job E! I love your fabric selections for your books!
ReplyDeleteYay! Yippee! Can you tell I'm completely excited? Thanks, Elizabeth!!
ReplyDeleteThis is so cute. I just made a bookshelf quilt last week - and I didn't piece my titles in either! So much faster. :]
ReplyDeleteFabulous! Thanks for linking up to {Sew} Modern Monday!
ReplyDeleteOur library is in desperate need of new books. Maybe I'll make this and raffle it off at their annual fund raiser.
ReplyDeleteAwesome tutorial! I can't wait to make one of these for my librarian niece.
ReplyDeleteGreat tutorial! Gotta add it to my list! I've been wondering how you tilted the end book!
ReplyDeleteSo cute! I love the selvages for titles! Thanks for the tutorial.
ReplyDeleteOooh, Ruby Star Rising joining an already cute project ... great job. Love the selvages too.
ReplyDeleteSuper, super awesome project!! I usually send my selvages to a friend but I might just have to hold back a few for this project....
ReplyDeleteThis is great. I love your tutorial. Where did you get that great fabric from though, the grey one with the french writing?
ReplyDeleteThanks again for the wonderful tutorial. I look forward to making this.
I seriously love this tutorial! Thanks so much for sharing!! :)
ReplyDeleteOh snap!! Thank you! LOVE this, you know we love this. It's so adorable! Thanks for linking to Fabric Tuesday :)
ReplyDeleteThis comment has been removed by the author.
ReplyDeleteyay! thanks for putting this together!
ReplyDeleteOh my goodness, I LOVE this! As a former English major, I really really really want to make one of these with all my favorite titles! Thanks for the great tutorial!
ReplyDeleteRachel @ Maybe Matilda
Ah! Love it!! Librarian here and I totally need to make one of these!!
ReplyDeleteI LOVE this!! I love to read, and collect books...I'll have to make one of these for my desk! So glad I found you on One Pretty Thing, I'll be following you now. :)
ReplyDeleteI've just found you via One Pretty Thing and I have to tell you how much I LOVE this miniquilt! I love books and this is a really good idea and beautiful work too! Congratulations and thank you for sharing!
ReplyDeleteGreetings from Hungary: Agnes
* bakarasz.blogspot.com *
This is just the sweetest little quilt, I love it! I have a few projects to finish, but I'd like to try it. My mother, who got me into quilting, is a librarian, and I'd love to make it for her! I am still very new to quilting, so I haven't made her anything yet, but this would be just perfect! Maybe for Mother's Day???
ReplyDeleteThank you for posting the tutorial!
So cute and original. Love it x
ReplyDeleteThat is so cute! I just love it! Thank you for the tutorial! :)
ReplyDeleteI love the fabric you've used on the back! What is it?
ReplyDeleteThis is so cute! I definitely need more wall art and this would look adorable next to one of our many bookcases! I'll have to make this soon :)
ReplyDeleteThis is certainly on my To Do list...thanks for the great tutorial!
ReplyDeleteI just found your blog and tutorial today-I love it and will make one for myself. I'm a big reader, a volunteer in a small library, and of course I have many quilting books.
ReplyDeleteBTW, my daughter is Elizabeth and is called Libby, which she has always loved. My niece was called Betsy, switched to Liz at a young age, now wants to be called Elizabeth--a beautiful name.
It's me again. You might like to send a photo of your quilt to Karen Griska of selvageblog.blogspot. She is the author of a book on quilting with selvages. She often posts photos of quilts made with selvages, and your quilt is a novel way of using them. Wait till you see some of the things made with selvages!
ReplyDeleteThanks for posting this tutorial, love this idea and hope to make one soon!
ReplyDeleteSo wonderful! WHAT IS THE BACKING FABRIC?? I love it!! Must have some now!
ReplyDeleteLOVE it! I did something similar with fabric that I had for a baby quilt.
ReplyDeletehttp://teachingthirdgraders.blogspot.com/2011/01/books-baby.html
And LOVE how you added the selvages for the book titles...very creative and fun!
Unbelievably CREATIVE! What a BEAUTIFUL piece this is, thank you for sharing. I am seeing cookbooks for the kitchen, nursery books for a childs room, novels for the master bedroom. What a GREAT idea.
ReplyDeleteThis is AWESOME! Two of my favorite things combines together! It looks tough but I want to try it!!! Love the book fabric on the back as well...do you have a link for that? I love the name selvages for book titles! This is just incredible...did I say that already...sorry I am just sooooo impressed and am in love with it! gotta do it!!
ReplyDeleteThank you for the tutorial!!
Oh, this is adorable! I'm not much of a quilter because I'm too impatient and sew too slowly, but this looks easy and fast enough that I could do it. And it would be SO cute to hang in the library where my mom is a librarian. Thanks for the great tutorial!
ReplyDeleteI love your bookshelf quilt. I'm going to try to make one in May. thank you so much for the tutorial. I love the photos, I'm a visual learner and your photos are very helpful.
ReplyDeleteThank you! Your tutorial is excellent. The idea is fantastic. I'll put on my list of things to do.
ReplyDeleteHugs Heloísa
Wow, I just found this and it's amazing- amazing! I love it! Any chance you remember the final Measurements of the mini quilt? Awesome tutorial- gonna have to make one!!!
ReplyDeleteThis is wonderful! I love the way you used the selvage too! Very clever!
ReplyDeleteI'm making one of these, but I have my favorite authors signing the book ends. So far, each one I've contacted have been thrilled to sign it for me. Makes the project take longer, but it'll be worth it in the end! Just another idea.
ReplyDeleteThis is such a great tutorial and pattern! Thanks for taking the time to write it all out and post it! I'm making one for my daughter's room and wondering what size you cut book # 13 (the leaning book). I just see measurements for # 1-12. I'm sure I can figure it out, but thought I'd ask just in case. Or, maybe its in the directions somewhere and I can't find it :)
ReplyDeleteThat looks awesome! I am a quilter and will soon be training to be a librarian, what I perfect way to bring my too loves together!! I'll have to make one one day (after I've made the quilts I'm working on...)
ReplyDeleteMe encanta este bloque y es un tutorial fantástico.
ReplyDeleteOooh la la! Love this too much! As a busy momma of 4 who also tries to fit in as much quilting as possible between her current Librarian courses at university... I MUST HAVE THIS!!! I see a little book sewing in my future, and not the paper kind at all! Super excited to dig through my selvages to find just the right titles! Thank you for the great and detailed tutorial! I think I can do this!!! Thank you!
ReplyDeleteMe gustó. Te quedan muy lindos.
ReplyDeleteGracias por compartir.
Yasmin
I just LOVE this, and it's even better that you made such a great tutorial. This is going on my to-do list!
ReplyDeleteI love this tutorial. I have wanted to make a bookshelf for some time and this helps. Thanks.
ReplyDeleteLove, love, LOVE this!! Thank you so much for sharing the how to!
ReplyDeleteI don't know if you saw this or not...but you made Etsy Facebook page. http://www.facebook.com/Etsy
ReplyDeleteWhooo Hooo!
This is amazing. I have always wanted tho quilt...and this may be just the right starting project!
ReplyDeleteThis is adorable, and I want to make it right away!
ReplyDeleteYou are an angel! Now I know what I'm going to make my LIBRARIAN daughter for Christmas! I love your mini quilt. Thanks for the great idea and fabulous instructions.
ReplyDeleteHugs from Mary
It appears #13 is 2"x12", same size as book #12. I dunno how I feel about having 13 books though, so I'm just going to use number 12 as the "leaner" and I guess I'll have a nice scrap of the fat quarter I bought. It is lovely.
ReplyDeleteI am working on this quilt right now, for my mother, who is a librarian! It is so adorable, I think I will make many more for friends! Thanks for the tutorial!
ReplyDeleteThanks for sharing this tutorial. I've wanted to make one for ages but have only planned it in my head. Having an easy 'how to' to follow has bumped this right up the list!
ReplyDeleteThanks so much for sharing this tutorial! I'm a person who loves direction, lol, so this will be so helpful! I love mini quilts, like pieces of art!
ReplyDeleteWow! Your last picture in the tutorial has so many books in it! What a great tutorial and now I wish I had saved all those selvages I have been tossing.
ReplyDeleteI just finished cutting my books and backgrounds... but wondering what the WOF means:
ReplyDeleteFrom your binding fabric, cut 2.5" strips to yield 98" of binding. If you are cutting WOF, this is a total of two 2.5" strips.
Thank you. Your quilt is so beautiful!
Thanks for your help Elizabeth, I really appreciate it! You made it perfectly clear :)
ReplyDeleteThis is fabulous... It's on my 'to make 'list.
ReplyDeleteWhat an awesome idea! I can think of so many people in my family that would like this. Thanks for sharing!
ReplyDeleteAwesome and totally cute.
ReplyDeleteLove this! Am thinking of making one for each of my nieces and nephews, with tailored book titles printed on TAP paper. Thanks for a great idea!
ReplyDeleteI love this quilt! I am going through my scraps now to make one for my mother, an elementary school librarian. :) Do you remember the name or designer of the fabric you used for the backing? It's perfect!
ReplyDeleteThis is so Cool. And my daughter
ReplyDeletewill Love It when I get hers done.
She loves books as much as I love sewing up neat stuff like this!
Thanks.
Love this tutorial!! I made a version of this for a very special recipient (my sis) and can't wait until she receives it! Here's my bookshelf - http://www.flickr.com/photos/27153465@N07/6941300710/in/photostream
ReplyDeleteThanks for your hard work and creativity!!
Love this tutorial!! I made this mini-quilt for my sister and cannot wait until she receives it! Here is a peek at my bookshelf - http://www.flickr.com/photos/27153465@N07/6941300710/in/photostream
ReplyDeleteThanks for all your hard work and creativity!!
I made this for my mother for Mother's Day. She's already called to tell me she loves it! Here's the post about it.
ReplyDeletehttp://cyndistitches.blogspot.com/2012/05/books-for-my-mother-for-mothers-day.html
I just made this for my dad for Christmas, thanks so much for the tutorial x
ReplyDeleteWhat an adorable little quilt! Thank you so much for sharing the tutorial.
ReplyDeleteI work in a library...totally have to make one to hang on our wall...THANK YOU!
ReplyDeleteThe modern feel to it is nice and freshening.
ReplyDeleteLove this and the tutorial. Thank you so much for sharing this!!
ReplyDeleteYour creation is fantastic. I have several book lovers in my house who would appreciate receiving a bookshelf miniquilt. Thank you for your hard work in making this tutorial. As you can tell, this tutorial will live for years and years as more book lovers find it.
ReplyDeleteCan't wait to make this. My daughter is a 1st & 2nd grade teacher, and loves books. This will make such a great x-mas present. We now only exchange gifts that are home made. GREAT IDEA. Thank you for your tutorial!!!!
ReplyDeleteI know I am late to the game, but I just found your tutorial for the books--I have to make it for a new friend.
ReplyDeleteBeyond that, I love your Blog Title. People always call me "Marg" and I really hate that! And, my pregnant granddaughter just posted "I hate it when people call me "Prego". Prego is a spaghetti sauce."
Thanks for the pattern and the smile. I am a new subscriber!!!
I've wanted to make this for over 2 years, and today I finally did it!! AH! I love this project so much. Thank you!!
ReplyDeleteI just came across your tutorial and am bookmarking it for later use. It is fantastic! I love yours!
ReplyDeleteLoved your books instantly. HAD to make it instantly! Thanks for wonderful tut. Matchstick quilted with walking foot. Only third quilt I have made. Thank thank thank you!
ReplyDeleteDorrie in Australia