First, thank you all so much for your well wishes about my munchkin's first day of school. He's been to school twice this week, and has loved every minute of it so far. While I miss the heck out of him while he's there, I've really enjoyed the little bit of free time it's allotted me and I've loved seeing the big grin on his face when I come to pick him up at school.
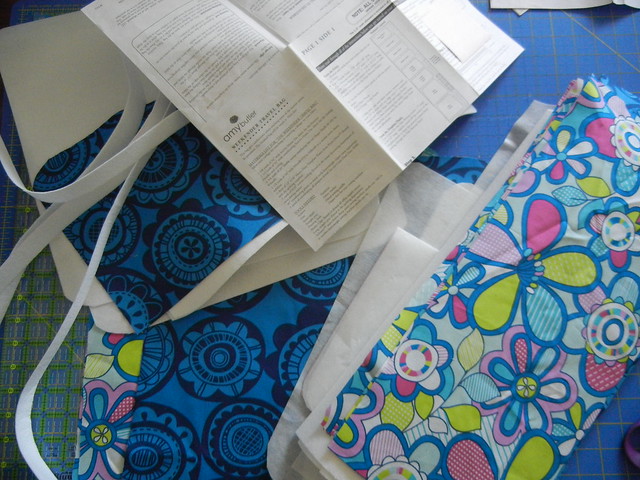
One of the things I've started working on is the infamous Amy Butler Weekender bag. Much has been written about this bag, and how maddening it can be to make, yet, I still wanted to make one. I picked some fabulous fabrics from Erin McMorris's Summersault collection, and I can see the finished bag in my head...but I suspect getting there is going to be challenging, to say the least.
There are 13 steps to making this bag, and I've gotten through the first two so far, which is a boatload of cutting. There's two kinds of interfacing used for this bag - Peltex 70 (the stiffest kind of Pellon interfacing) and a lightweight interfacing, like ShapeFlex. Officially, there are 22 pieces cut from the lining and exterior fabrics, and 23 pieces cut from the two interfacings. It was tedious, to say the least, but I made it through. It's the next step that's got me freaked out.
Step 3 is where I get to make my own piping to go with the bag. I cut a bazillion bias strips to create the piping with, and I've got the cording, but I am not looking forward to this step. Why? Because I've never done it before, and it doesn't sound like fun. But, I'm going to do it, and hopefully it will be easier than it seems. I've read the step three times this morning, I'm as ready as I'm ever going to be.
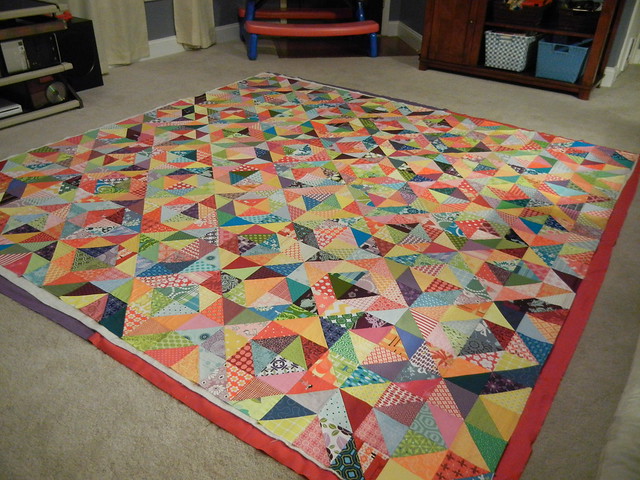
Speaking of ready, my sweet, helpful husband helped me baste my behemoth warm/cool quilt last night. I'm definitely nervous about trying to quilt it, but at the same time, I'm kind of looking forward to it, so I can get a real quilt on our bed. And if nothing else, quilting this bad boy will be a nice break from working on my Weekender bag! Happy sewing this weekend :)
Saturday, August 27, 2011





The bag looks totally scary to me!
ReplyDeleteHurray for helpful (and wonderful) husbands - mine is one too!
I think once you jump into the piping it will be better than expected. Not speaking from experience here, of course, but I think the making of the piping may be simpler than the applying of the piping to several layers of fabric and interfacing. That Peltex 70 is a pain to wrangle. Am I being Debbie Downer this morning? Sorry, I'm sure you'll be just fine. On a brighter note, YAY for helpful husbands! Can't wait to see your finished projects!
ReplyDeleteThat top looks gorgeous!! Don't worry - piping is not so bad! i've done a bunch on pillows - use your zipper foot!
ReplyDeletewow! I love this quilt! amazing! I have to bast a big quilt too for a double size bed...and then quilting it...haven't done a big one for a long time!
ReplyDeletegreat fabric choice for your bag. Good luck with the piping!
This sounds like a fun weekend to me! I've done piping before, and it was much easier than I expected. You can do it!!
ReplyDeleteI've been thinking about attempting that bag...I'll be following to see how you make out!
ReplyDeletePiping is no biggie! You can do it, promise! I can't wait to see your Warm/Cool quilt quilted!
ReplyDeleteThe tip I've seen for the piping is to fuse the seams together. It makes it easier to wrangle.
ReplyDeleteI've never had a problem making cording... as mentioned above, use you zipper foot.
ReplyDeleteI want to make this bag more and more. I can't wait to see how yours turns out. Piping is easy. I also use my my zipper foot.
ReplyDeletePiping? Pfft, you'll nail that easy. And...once you know how to do it you will want to pipe everything. It makes everything look so *finished* and *professional*! I won't say good luck because you don't need it so instead... Have fun!
ReplyDeleteYou'll be fine with the piping - it's not as scary as it first appears! Can't wait to see round 2!
ReplyDeletePiping can be so rewarding--it just finishes the seam--I've gotten good results with my zipper foot, but excellent results when I use a piping foot (or any foot w/ a groove in the bottom). I usually use a cordonnet foot for very small piping with fabulous results. Best wishes; I can't wait to see your Weekender!
ReplyDeleteI love the warm/cool quilt and can't wait to see what type of quilting you do for it... meanwhile I have a question for you; Do you pin baste on carpet?!? Do you have a secret for that? I ALWAYS end up pinning the carpet onto the quilt (Duh), but in the middle I can't reach under it to make sure I don't get the carpet. I pin baste on the basement floor which hurts knees and back a lot so if you have a secret for the carpet I would LOVE to hear it! Even if it's a common sense secret please let me know because sometimes the most obvious escapes me... truely!
ReplyDeletePiping is fine really! I once set about making a tonne of co-ordinating cushions for my living room. I'd got some Liberty home decor weight and thought I'd do zips and piping as per an instruction in a book - although this was pretty much my first attempt on both counts. I was too naieve to know that these can be tricky so had no fear and it all worked out fine!
ReplyDeleteI love the fabric you chose for your bag! Don't worry about the cording, it's not a big deal!
ReplyDeleteI really like your warm/cool quilt and the fabric you chose for your weekender travel bag! I'm working on a warm/cool quilt, but I won't be tackling the travel bag.
ReplyDeleteThanks so much! I have been managing not to buy Erin Mcmorris' Summersault in that gorgeous cheerful blue, because I don't need another quilt to start. Now however, a certain smarty-pants, who shall remain nameless ;0), has me thinking I might NEED a weekender bag...
ReplyDeleteYou are an enabler you know! Love what you are doing. You can soooooo do this!!!
yikes! Just hearing about the interfacing for your bag is enough to scare me away! I made an AB diaper bag for my daughter & I actually cried(!) making it! Sure hope your project goes well.
ReplyDeleteAnd yay for a big colorful, basted quilt! Good luck quilting!
The warm/cool quilt looks so inviting! How sweet of your hubby to help baste!!
ReplyDeleteI have never done piping either, but I think I am going to track that pattern down and give it a shot! tHat bag looks amazing! Good luck!! Have no fear! You'll do great, and when that step is done, you'll wonder why you were scared in the first place!! :)
You are one BRAVE lady. : ) I can't wait to see how the bag turns out! You can do it!
ReplyDeleteThe piping really isn't too bad to make - remember the zipper foot. The tricky part for me is getting all of the layers to line up right when I sew it between things. I really like to baste it in place with a wide zig zag to one of the pieces of fabric it will be between so it doesn't slip. Oh, and keep the zipper foot as close to the bulge the piping makes as humanly possible while sewing the layers together. And - one more thing - when making the piping use the matchiest thread possible so you won't notice if a stitch or two shows.
ReplyDeleteIf you can make a trillion HST for your quilt you can do this. :) It is beautiful!!
I have a few Amy Butler bag patterns that I have been reluctant to try as they seem so overly complicated- I make bags all the time (no patterns) and they are typically so easy for me, I just don't understand why she makes them so complex. A word about piping- invest in a piping foot for your machine and you will be so glad you did. A zipper foot makes pretty good piping, but if you are looking for a super professional outcome the piping foot is the only way to go- you will be using it all the time once you see the outcome so it will totally pay off to get one. I wish you the best with your bag- and that quilt is GORGEOUS!! Happy Saturday!
ReplyDeleteYour weekender bag is going to be awesome!!! I think you'll do fine with the piping.
ReplyDeleteGood luck with the cording :) Those fabrics look great together, the finished bag will be so worth all the trouble.
ReplyDeleteGood luck with the cording!! I'm sure once you get started, it will be a cinch ;-) Congrats on getting that bad boy basted!! Any ideas on how your going to quilt the warm/cool??
ReplyDeletewonderful quilt top and brave brave you w/ the weekender! It will be wonderful with those fabrics ...
ReplyDeletegood luck!
I've done piping before and even though it seemed like it would be hard - it was quite easy and very satisfying to make! The zipper foot does the job well!
ReplyDeleteI like your quilt - yay for helpful husbands! Can't wait to see it all quilted. =)
ReplyDeletewhy i have never thought to ask for my husbands help to baste a quilt, i have no idea! you are genius! i am not sure my husband will thank you but i sure do! love the fabrics you chose for the bag. i hope that you have fun making your bag and that it is like a walk in the park.
ReplyDelete"Round 1" reminds that, yes, you WILL be boxing/wrestling. I wish I would have read the tip about fusing the piping before I made mine. I would totally have tried that. However...I used my dad's industrial sewing machine which stitched right next to the piping. Sounded like a good idea at the time, but it turned out to be a BIG mistake!! I wish you good thoughts. Another friend who had just completed the Weekender texted me through the whole process. So if you want to become texting buddies, let me know! :)
ReplyDeleteP.S. Your warm/cool quilt is awesome!
ReplyDeleteI sympathise!! It's me vs. the Cosmo bag at the moment, I've JUST finished all the cutting and interfacing! madness! I'm hoping it will be worth it in the end!
ReplyDeleteThis quilt is so lovely, you have done such a brilliant job!
ReplyDeleteSoapy